Showing posts with label 点心 DimSum. Show all posts

Sunday, 30 August 2015

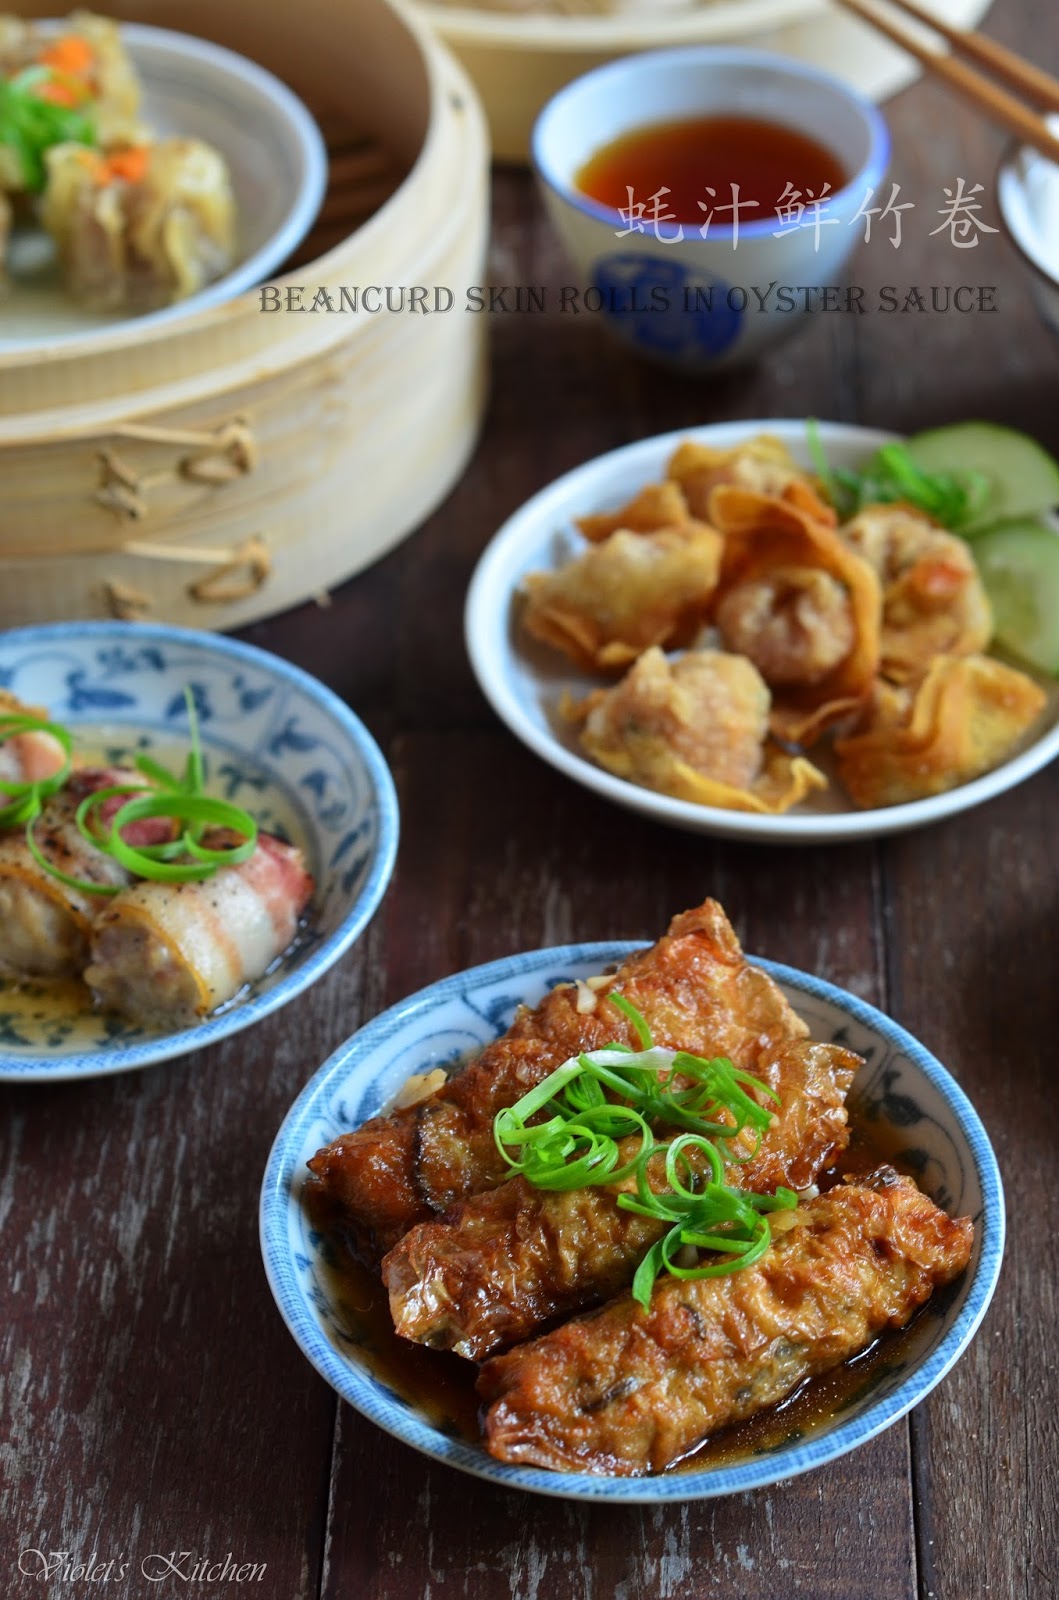
蚝汁鲜竹卷 Beancurd Skin Rolls in Oyster Sauce

去吃点心时老公喜欢点炸的腐皮卷,而我就喜欢点这个炸了又加上蚝油酱汁一起蒸的蚝汁鲜竹卷。每家的蚝汁鲜竹卷都有自己的特色,家家的馅料和酱汁方面都会有少许不同,所以我做出来的蚝汁鲜竹卷叶也和外面的有一些不同。老公就说不是很像,而我呢就觉得那个酱汁不错,不过腐皮卷方面可能是腐皮比较少,所以吃起来有点不一样。这蚝汁鲜竹卷还有进步的空间,下次会加多一些腐皮,可能吃起来就会比较像。


点心午餐 ~ 蚝汁鲜竹卷蒸 + 烧卖 + 蒸烟肉卷 + 炸云吞


之前的脆炸烟肉卷没一次过煮完,
我把包好的烟肉卷冷冻起来,
其实除了炸也可以用来蒸,
我撒了一些黑胡椒然后拿去蒸,
这样就变成另一款点心了。


蚝汁鲜竹卷

材料:
淡腐皮 12张(尺寸15cm X 13cm)
蛋白 少许
葱丝 少许

馅料:
猪绞肉 250克
去壳虾肉 75克(去肠泥,切丁)
红萝卜 30克(切丝)
浸软黑木耳 20克(切丝)
葱花 1汤匙

调味料:
酱油 1汤匙
麻油 1/2汤匙
黄糖 1/2茶匙
粟粉 1汤匙
白胡椒粉 1/4茶匙
蛋白 1/2个

酱汁:
蒜茸 1/2汤匙
姜茸 1/2汤匙
蚝油 1汤匙
麻油 1/2汤匙
黄糖 1茶匙
绍兴酒 1汤匙
白胡椒粉 少许

芡汁:
粟粉 1/2汤匙
清水 2汤匙

做法:
1. 在一个大碗里加入猪绞肉、虾肉、红萝卜、黑木耳、葱花和调味料。用清洁的手将材料搅拌,往同一个方向搅拌数分钟直到馅料搅至有粘性及均匀,然后将馅料分成12份。
2. 取一张腐皮,用一块清洁的湿布轻轻地抹一抹,放入一份馅料,如以下图中将腐皮卷起来。用少许蛋白搽于腐皮封口。一直重复做法直到用完所有馅料。
3. 把包好的腐皮卷放入热油锅中炸至金黄色,然后盛出备用。
4. 在一个小锅中烧热1汤匙的油,加入蒜茸和姜茸爆香。倒入其他酱汁材料煮至滚,加入芡汁勾芡,煮至酱汁浓稠即可。
5. 把炸好的腐皮卷排入四个小碟中,淋上酱汁,放入竹蒸笼中蒸10分钟即可。撒上少许葱丝,乘热享用!


Beancurd Skin Rolls in Oyster Sauce

Ingredients:
12 pieces unsalted beancurd skin, size 15cm X 13cm
Some egg white
Some spring onion, julienned

Filling:
250 g minced pork
75 g shelled prawn, deveined and diced
30 g carrot, finely chopped
20 g soaked black fungus
1 tbsp chopped spring onion

Seasoning:
1 tbsp soy sauce
1/2 tbsp sesame oil
1/2 tsp brown sugar
1 tbsp cornstarch
1/4 tsp white pepper powder
1/2 egg white

Sauce:
1/2 tbsp minced garlic
1/2 tbsp minced ginger
1 tbsp oyster sauce
1/2 tbsp sesame oil
1 tsp brown sugar
1 tbsp Shao Xing wine
A dash of white pepper powder

For thickening:
1/2 tbsp cornstarch
2 tbsp water

Methods:
1. In a mixing bowl, add minced pork, diced prawn, carrot, black fungus, chopped spring onion and seasoning. Mix the ingredients using your clean hands in one direction for few minutes until it becomes sticky and well mix. Divide the fillings into 12 portions.

2. Place a piece of the beancurd skin on a flat surface, wipe the beancurd skin carefully using a damp cloth to soften it. Place 1 portion of the filling in the middle of the beancurd skin. Roll the beancurd skin like as shown in the picture above. Brush some egg white on the edge to secure the roll. Repeat until all the fillings are used up.

3. Deep fry the beancurd rolls in hot oil until golden brown, dish out and set aside.

4. Heat 1 tbsp of cooking oil in a small saucepan. Add minced garlic and minced ginger, saute until fragrant. Add the remaining sauce ingredients, bring to a boil, Pour in the cornstarch slurry, stir well and cook until the sauce is thicken.

5. Arrange the fried beancurd skin rolls in 4 small plates, pour the sauce over, then place the small plates in the bamboo steamer basket and steam over high heat for 10 minutes. Sprinkle with some julienned spring onion and serve hot.


I'm submitting this post to the Best Recipes for Everyone August 2015 Event (BREE# 12 Dim Sum) organized by Fion of XuanHom's Mom and co-hosted by May (厨苑食谱).


This post is also linked to the event Little Thumbs Up (Aug 2015 : Brown Sugar and Molasses) organised by Zoe of Bake for Happy Kids and Doreen of My Little Favourite DIY and hosted by Jess from Bakericious.


荷叶糯米鸡 Glutinous Rice with Chicken Wrapped in Lotus Leaf

去年的端午节想自己尝试裹粽子,所以就买了一大包的干荷叶,结果要照顾小宝贝最后还是不了了之。到了今年我又有同一个念头,我又去买了包糯米回来, 结果还是没做成,两样食材就这杨样摆在厨房,就连老公看了也一直投诉我的东西太多了。上回去那家著名的点心店用餐时看到那里有荷叶糯米鸡,我很想试可是却点了蛮多的食物,最后只好作罢。回家后我还是对那糯米鸡念念不忘,反正家里有现成的材料,所以我就找了几个食谱来参考,东凑西凑,最后就做出一个合自己口味的荷叶糯米鸡。


荷叶糯米鸡

材料:
糯米 400克, 浸泡至少4小时或收入冰箱至隔夜
食油 5汤匙
蒜茸 2汤匙
红葱茸 2汤匙
鸡全腿 2个(去骨切成小块)
虾米 1/4杯,浸泡10分钟,沥干备用
香菇 4朵(浸泡至软,切半)
腊肠 1条(斜切片)
咸蛋黄 4个
干荷叶 4片

糯米饭调味料:
老抽 1/2汤匙
蚝油 1汤匙
黄糖 1/2茶匙
白胡椒粉 1/4茶匙
麻油 1/2汤匙

鸡肉腌料:
蚝油 1 1/2汤匙
老抽 1茶匙
黄糖 1茶匙
白胡椒粉 1/4茶匙
麻油 1汤匙
粟粉 1汤匙

做法:
1. 将干荷叶浸泡30分钟或至软,捞起沥干水份,以厨房纸巾抹干。将鸡肉以及香菇用腌料腌制至少1小时。

2. 在一个锅里加入3汤匙的油,以中火烧热,然后加入1汤匙的蒜茸和1汤匙的红葱茸爆香。加入虾米拌炒大约1分钟,然后加入糯米和调味料,炒至均匀即可。将炒好的糯米盛入蒸盘里,然后放入锅以大火蒸45分钟。

3. 在另一个锅里加入2汤匙的油,以中火烧热,然后加入1汤匙的蒜茸和1汤匙的红葱茸爆香。加入腌制好的鸡肉及香菇,拌炒大约2至3分钟直到半熟,盛出备用。

4. 把蒸好的糯米饭分成8份,馅料(鸡肉、香菇、腊肠和咸蛋)分成4份。把一张荷叶放入一个四方形的碗里,然后加入1份的糯米,接着排入1份的馅料,最后再加入1份的糯米即可。将荷叶包成一个四方形包裹,倒模,然后以棉绳绑好。一直重复做法直到用完所有荷叶及糯米。

5. 把荷叶包裹放入竹蒸笼里,以高火蒸45分钟。将包裹从蒸笼取出,剪开荷叶,撒上青葱粒,乘热享用。


Glutinous Rice with Chicken Wrapped in Lotus Leaf

Ingredients:
400 g glutinous rice, soaked for 4 hours or overnight in refrigerator
5 tbsp cooking oil
2 tbsp minced garlic
2 tbsp minced shallot
2 chicken whole legs, deboned and cut into bite sizes
1/4 cup dried shrimp, soaked for 10 minutes, then drained
4 dried shiitake mushroom, soaked till soften, then cut into half
1 Chinese sausage, sliced diagonally
4 salted egg yolks
 pieces of dried lotus leaves

Seasoning for rice:
1/2 tbsp dark soy sauce
1 tbsp oyster sauce
1/2 tsp brown sugar
1/4 tsp white pepper powder
1/2 tbsp sesame oil

Marinade for chicken:
1 1/2 tbsp oyster sauce
1 tsp dark soy sauce
1 tsp brown sugar
1/4 tsp white pepper powder
1 tbsp sesame oil
1 tbsp corn flour

Method:
1. Soak the lotus leaves for 30 minutes or until the leaves are softened. Drain and pat dry with kitchen paper towel. Marinate the chicken and soaked shiitake mushroom with marinade for at least 1 hour.

2. Heat 3 tbsp of oil a wok over medium heat, add 1 tbsp of minced garlic and 1 tbsp of minced shallot, saute until fragrant. Add dried shrimp and stir fry for 1 minute. Add glutinous rice and seasoning, stir fry until well combined. Dish the glutinous rice onto a steaming tray, and steam for 45 minutes over high heat.

3. Heat 2 tbsp of oil in another frying fan over medium heat, add 1 tbsp of minced garlic and 1 tbsp of minced shallot, saute until fragrant.  Add the marinated chicken and mushrooms, stir fry for 2 to 3 minutes until half cooked. Dish out and set aside.

4. Divide the steamed glutinous rice into 8 portions and the fillings (chicken, mushrooms, sausage and salted egg yolks) into 4 portions. Place a piece of lotus leaf onto a square bowl, fill the center of lotus leaf with 1 portion of glutinous rice, then place 1 portion of fillings, lastly top with another portion of glutinous rice. Wrap the lotus leaf into a square parcel, unmould and secure with kitchen twine. Repeat with remaining lotus leaf and rice.

5. Place the lotus leaf parcels in the bamboo steamer basket and steam over high heat for 45 minutes.
Remove from steamer and unwrap the parcels. Sprinkle with some chopped spring onion and serve hot.


I'm submitting this post to the Best Recipes for Everyone August 2015 Event (BREE# 12 Dim Sum) organized by Fion of XuanHom's Mom and co-hosted by May (厨苑食谱).


This post is also linked to the event Little Thumbs Up (Aug 2015 : Brown Sugar and Molasses) organised by Zoe of Bake for Happy Kids and Doreen of My Little Favourite DIY and hosted by Jess from Bakericious.


Saturday, 29 August 2015

豆豉蒸排骨 Steamed Spare Ribs with Preserved Black Bean

点心茶楼的豆豉蒸排骨是我的最爱之一,喜欢那蒸得又滑又嫩的排骨。之前无意间找到了一个食谱,一直都很想尝试,趁这个月的点心月就赶紧试了这食谱,然后再分享给大家。这食谱用了浸泡的方式来处理排骨,浸泡了两小时排骨的颜色会比较淡,而且血水也去掉了,这样腌制起来就比较容易入味。腌制时加了些马铃薯淀粉,蒸好后的排骨吃起来就会滑滑的。之前曾吃过加入了南瓜或者是芋头一起蒸的排骨,所以这次我也加入了一些南瓜丁和芋头丁一起蒸,吃起来的口感真的很不错,而且营养也比较均衡。


由于豆豉蒸排骨是必须现蒸现吃的,所以晚餐当天我就没拍照,不过我就预先留了一些排骨起来,打算隔日才蒸来当午餐。这次拍的豆豉蒸排骨看起来不是那么滑,可能是腌制了较长的时间,不过晚餐当天的排骨蒸得很嫩,而且很滑,芋头也蒸得软软粉粉的,是我喜欢的那种口感。


这小碟豆豉蒸排骨里的芋头是炸过的,
虽然可以保持美美的形状,
可是吃起来就没那么软和粉。
晚餐的那一盘我直接将芋头和排骨一起蒸,
蒸好后的芋头好软好粉,非常好吃。


点心午餐 ~ 芋头豆豉蒸排骨 + 南瓜豆豉蒸排骨 + 蚝汁鲜竹卷 + 烧卖


找了几间超市都找不到盐制的豆豉,
过后家婆从巴刹帮我买到了这罐豆豉。


豆豉蒸排骨

(食谱参考Wok and fry,做少许更改)

材料:
排骨 500克
芋头丁或南瓜丁 少许 (可不放)
红辣椒 1条(切丝)
豆豉 1 1/2汤匙
青葱 1根(切粒)

腌料:
盐 5克
黄糖 5克
马铃薯淀粉 10克
酱油 1茶匙
蒜油 1汤匙
麻油 1茶匙
白胡椒粉 1/4茶匙

做法:
1. 把排骨斩成小块,然后浸泡在冷水里2小时。沥干水份,然后用厨房纸巾抹干。
2. 以腌料腌制排骨一小时。
3. 把芋头丁或南瓜丁放入数个小碟里,然后加入腌制好的排骨,撒上豆豉和辣椒丝。把小碟放入竹蒸里,以大火蒸10分钟或至排骨熟透,撒上葱花,即可乘热享用。


Steamed Spare Ribs with Preserved Black Bean 

(Recipe adapted from Wok and fry, with some adjustments)

Ingredients:
500 g spare ribs
Some yam or pumpkin, diced (optional)
1 red chilli, julienned
1 1/2 tbsp preserved black bean
1 stalk spring onion, finely chopped

Marinade:
5 g salt
5 g brown sugar
10 g potato starch
1 tsp light soy sauce
1 tbsp garlic oil
1 tsp sesame oil
1/4 tsp white pepper powder

Methods;
1. Chop spare ribs into bite size pieces and soak in cold water for 2 hours. Drain and pat dry with kitchen towel.
2. Marinate the spare ribs with marinade for 1 hour.
3. Place the diced yam or pumpkin in small plates, then top with marinated spare ribs. Sprinkle with some preserved black beans and julienned red chilli. Place the small plates in bamboo steamer basket, steam over high heat for 10 minutes or until the spare ribs are cooked. Sprinkle with some chopped onions and serve hot.


I'm submitting this post to the Best Recipes for Everyone August 2015 Event (BREE# 12 Dim Sum) organized by Fion of XuanHom's Mom and co-hosted by May (厨苑食谱).


This post is also linked to the event Little Thumbs Up (Aug 2015 : Brown Sugar and Molasses) organised by Zoe of Bake for Happy Kids and Doreen of My Little Favourite DIY and hosted by Jess from Bakericious.


Friday, 28 August 2015

锦卤云吞 Fried Wonton with Sweet and Sour Sauce

锦卤云吞又名锦绣良缘,是典型的广东乡土菜肴,乃乡土间老百姓举办喜庆之筵席颇受欢迎的菜品。有人探其锦绣良缘之名字的由来,看此菜肴,其原料在颜色搭配上红中带绿、金黄、橙并之,又有人想象成是男女间美的结合点,可增进两者的感情。是红男绿女的代表菜,此菜肴在婚宴上尤其受老百姓青睐。锦卤云吞的用料是很讲究的,将云吞皮包入少量冷藏过的鲜虾肉馅,对折成多角形后入热油炸脆酥,然后配上同虾肉粒、叉烧粒、鱿鱼粒、鸡肝片、洋葱末、青、红椒末、等煸炒成的甜酸芡来蘸食,但一定要趁热吃才显得有滋味。脆香酥化,甜酸味鲜,色泽鲜艳,是脆溜特色小食。(资料来源百度百科)


那天准备酿豆腐卜时还剩下一点馅料,所以就用了云吞皮将馅料包起来,过后炸来当点心餐的点心之一。吃过一次炸云吞后又嘴馋相吃第二次,突然就想起了以前吃过的锦卤云吞,锦卤云吞是配搭酸甜酱汁一起吃的炸云吞。炸得酥脆的云吞皮蘸着酸甜酱汁一起吃真的很开胃,而且吃起来一点也不会感觉到油腻。上网搜索食谱时,一找就找到了基絲汀的锦卤云吞,准备好材料后就赶紧包云吞,因为我迫不及待想试这个酸酸甜甜的酱汁。


除了参考基絲汀的做法,我也看了苏Good的节目,发现这道锦卤云吞真的是很费功夫,不但材料多,而且工序也多,不过为了美味的锦卤云吞,辛苦一点都是值得的。我做了两款不同的云吞,一个是元宝形的,而另一个是三角形的。元宝形的云吞是比较美,不过吃起来三角形的云吞比较好吃,因为酥炸的部份比较多。从这里看到另一个很特别的云吞包法,炸好后可以直接将配料和酸甜酱汁放在云吞皮上面吃,可惜我发现得太迟了,所有的云吞都包好了,而且也没剩云吞皮了,试不到这个包法,惟有等下次再试了。锦卤云吞里的酸甜酱汁配料非常丰富,有虾、鱿鱼、叉烧和一些蔬果,其实可以直接当做一道菜肴了。虽然锦卤云吞是小食,不过拿来当成晚餐菜肴也不错,因为酸酸甜甜的酱汁超级下饭。


其实以前曾吃过两次锦卤云吞,一次是元宝形的云吞,另一个就是“斋云吞”。当时吃这个“斋云吞”时还闹了一场笑话,点餐时餐牌的照片是元宝形云吞,不过侍应却告知可能煮出来的云吞会和照片不一样,虽然有点心理准备,怎知道最后送上来的却是“斋云吞”。“斋云吞”就是纯炸云吞皮,连馅料都没有,当时家人感觉被骗,还吵着以后都不再点这道菜了。直到最近看了苏Good的节目后才发现,其实太多馅料的云吞未必是好,有些人甚至会要求要炸云吞皮而已,当时吃的“斋云吞”说不定是比较正宗的做法。


锦卤云吞

(食谱参考简易食谱,做少许更改)

材料:
云吞:
云吞皮 45张
猪绞肉 130克
去壳虾肉 170克(去肠泥)
水 适量(用来黏云吞皮)

猪肉腌料:
酱油 1/2茶匙
黄糖 1/2茶匙
粟粉 1/2茶匙
盐 1/4茶匙
水 1茶匙

虾肉腌料:
盐 1/4茶匙
粟粉 1/2茶匙
胡椒粉 少许
麻油 1/2茶匙
黄糖 1/4茶匙
蛋白 1/2个

酸甜酱汁材料:
蒜茸 1/2汤匙
红葱茸 1/2汤匙
洋葱 1/2个(切小块)
青椒 1个(切小块)
中虾 4只(去壳去肠泥)
鱿鱼 75克(切花,然后切块状)
叉烧 60克
罐头黄梨块 200克
罐头黄梨糖水 1+1/4杯

酸甜酱汁调味料:
番茄酱 6汤匙
白醋 3汤匙
黄糖 3汤匙
喼汁 1汤匙
盐 1/4茶匙

芡汁:
粟粉 1汤匙
清水 2汤匙

做法:
1.云吞:
把虾洗净,沥干水份,然后用厨房纸巾抹干,每只虾切2至3段。分别用腌料腌制虾和猪肉,收入冰箱腌制30分钟。
取一张云吞皮,放入虾和猪肉馅料,用少许水插于云吞皮四边,然后斜对折成三角形,或你可以像下图中将云吞折成元宝形。一直重复做法直到用完所有馅料。
以中火烧热适量的油,放入云吞,炸至两面呈金黄色即可。把炸好的云吞捞起,放在厨房纸巾上吸取多余的油份,备用。

2. 酸甜酱汁:
加入1/2汤匙的油在平底锅里,以中火烧热。放入虾和鱿鱼,炒至海鲜熟即可盛出备用。再加入1/2汤匙的油,加入蒜茸和红葱茸爆香。加入洋葱和青椒,继续炒多1分钟。加入罐头黄梨糖水和调味料,大火煮滚,加入芡汁勾芡,煮至酱汁浓稠即可。最后再加入炒熟的海鲜、叉烧和罐头黄梨块即可熄火。

3. 上桌:
将炸好的云吞排盘,伴与酸甜酱汁乘热享用。


Fried Wonton with Sweet and Sour Sauce

(Recipe adapted from Christine's Recipes, with some adjustments)

Ingredients:
45 pieces wonton wrappers
130 g minced pork
170 g shelled prawn, deveined
Some water, for wrapping wontons

Marinade for minced pork:
1/2 tsp soy sauce
1/2 tsp brown sugar
1/2 tsp cornflour
1/4 tsp salt
1 tsp water

Marinade for prawns:
1/4 tsp salt
1/2 tsp cornflour
A dash of white pepper powder
1/2 tsp sesame oil
1/4 tsp brown sugar
1/2 egg white

Sweet and Sour Sauce:
1/2 tsp minced garlic
1/2 tsp minced shallot
1/2 onion, cut into small pieces
1 green capsicum, cut into small pieces
4 medium prawns, shelled and deveined
75 g squid , scored then cut into pieces
60 g char siu, sliced
200 g canned pineapple cubes
1+1/4 cup syrup from canned pineapple

Sweet and Sour Sauce seasoning:
6 tbsp tomato ketchup
3 tbsp white vinegar
3 tbsp brown sugar
1 tbsp Worcestershire sauce
1/4 tsp salt

For thickening:
1 tbsp cornstarch
2 tbsp water

Method:
1. Wonton:
Wash the prawn, drain and pat dry with kitchen towel. Cut each prawns into 2 to 3 sections. Marinate the prawns and minced pork with marinade, keep in the refrigerator for 30 minutes.

Place some prawn and minced pork fillings in the middle of one wonton wrapper, Damp the edges of wonton wrapper with some water. Fold diagonally and make a triangle shape, or you may wrap the wonton into other shape like the one shown in the picture above. Repeat until all the fillings are used up.

Heat oil in a wok over medium heat, place the wontons into the hot oil and deep fry until golden brown on both sides. Dish out and drain on kitchen paper towels.

2. Sweet and Sour Sauce:
Heat 1/2 tbsp of oil in a frying pan over medium heat. Add prawns and squid, stir fry the seafood until cooked, dish out and set aside. In the same pan, heat 1/2 tbsp of oil, add minced garlic and shallot, saute until fragrant. Add onion and capsicum, stir fry for about 1 minute. Add syrup from canned pineapple and seasoning, bring to boil, then stir in the cornstarch slurry and cook until the sauce is thicken. Lastly, add the cooked seafood, char siu and canned pineapple cubes. Turn off the heat.

3. To serve:
Transfer the fried wontons to a serving plate. Serve hot with the sweet and sour sauce.


I'm submitting this post to the Best Recipes for Everyone August 2015 Event (BREE# 12 Dim Sum) organized by Fion of XuanHom's Mom and co-hosted by May (厨苑食谱).


This post is also linked to the event Little Thumbs Up (Aug 2015 : Brown Sugar and Molasses) organised by Zoe of Bake for Happy Kids and Doreen of My Little Favourite DIY and hosted by Jess from Bakericious.


Related Posts Plugin for WordPress, Blogger...