Showing posts with label 海鲜 Seafood. Show all posts

Thursday, 31 March 2016

香橙迷迭香三文鱼 Orange-Rosemary Glazed Salmon

蜜汁三文鱼后,昨天我又再尝试煮新口味的三文鱼,香橙迷迭香三文鱼。以香橙和迷迭香煮的酱汁吃起来酸酸甜甜的,蛮开胃的,味道也和三文鱼很搭配。昨天的晚餐除了香橙迷迭香三文鱼外,我还准备了炒菠菜及糙米饭。最近每个星期至少煮一次糙米饭,晚餐时的蔬菜也多煮些,希望家人可以吃得健康点。我家里最喜欢吃糙米饭的就是小宝贝了,每次都吵着我要煮糙米饭,可是我不敢煮这么多次,怕家婆接受不到。我家小宝贝一看到三文鱼就很开心了,可惜她却不喜欢这个新煮法,吃晚餐时看到我把额外的酱汁淋在鱼上就一直告诉我说不要酱汁,过后我只好拨开外面的那层,取里面的鱼肉给她。和之前的蜜汁三文鱼相比,小宝贝会比较喜欢之前的蜜汁三文鱼,加上当天我煮了藜麦饭,她一口接一口地吃个不停。看来我还得花些功夫,多煮些不同的食物让她尝试和接受。


香橙迷迭香三文鱼 

(食谱参考Cooking Classy,作少许更改)

材料:
橄榄油 2汤匙
三文鱼 3块,厚约1寸(静置在室温下10分钟)
盐和现磨黑胡椒 适量
蒜头 2瓣(切碎)
新鲜迷迭香2 1/2茶匙(切碎)
鸡汤 1/4杯 + 1汤匙
橙皮茸 1/2茶匙
新鲜橙汁 2/3杯
柠檬汁 1汤匙
蜂蜜 3汤匙
粟粉 2 1/2茶匙

做法:
1. 以中高火烧热平底不沾锅。把盐和黑胡椒涂抹在三文鱼的两面。把橄榄油加入锅中烧热,然后加入三文鱼,煎至两面都呈金黄色,每面煎大约2分钟,盛出备用。

2. 在同一个平底不沾锅里加入蒜头和迷迭香,炒大约20秒,然后加入1/4杯鸡汤煨煮,直到大部份鸡汤蒸发了。拌入橙皮茸、橙汁、柠檬汁和蜂蜜。在一个小碗里加入1汤匙的鸡汤及粟粉,搅拌至均匀。将粟粉水倒入锅里,加入适量的盐和胡椒调味,煮至酱汁滚后继续小火煨煮1分钟,期间要不断搅拌。将三文鱼放回平地锅里用汤匙勺香橙迷迭香酱汁淋在三文鱼上

3. 将三文鱼盛碟,以香橙片及迷迭香装饰,伴与炒菠菜及糙米饭一起享用。


备注:
*烹煮的时间视鱼的厚度而定,请自行调整。


Orange-Rosemary Glazed Salmon

(Recipe adapted from Cooking Classy, with some minor adjustments)


Ingredients:
2 tbp olive oil
3 salmon fillets (1-inch thick), rested at room temperature 10 minutes
Salt and freshly ground black pepper
2 cloves garlic, minced
2 1/2 tsp minced fresh rosemary
1/4 cup + 1 tbsp chicken broth
1/2 tsp orange zest
2/3 cup fresh orange juice
1 tbsp fresh lemon juice
3 tbsp honey
2 1/2 tsp cornstarch


Methods:
1. Heat a large non-stick saute pan over medium-high heat. Season both sides of salmon with salt and pepper. Heat olive oil then add salmon and cook until browned on both sides and cooked through, about 2 minutes per side. Transfer to a plate, leaving oil in pan.

2. Add garlic and rosemary to pan and saute 20 seconds, then add 1/4 cup chicken broth and simmer until mostly reduced. Stir in orange zest, orange juice, lemon juice and honey. In a small bowl whisk together remaining 1 tbsp chicken broth with cornstarch. Pour into pan, season sauce with salt and pepper to taste then bring to a boil and allow to boil 1 minute, stirring constantly. Return salmon to pan, spoon sauce over salmon.

 3. Transfer the salmon fillet to serving plate, garnish with some orange slices and rosemary. Serve with stir fried spinach and brown rice.


Note:
*The time of cooking is depending on the thickness of the salmon fillet, please adjust accordingly.


This post is linked to the event Little Thumbs Up (Mac 2016 : Honey) organised by Zoe from Bake for Happy Kids and Doreen from My Little Favourite DIY and hosted by Joyce from Joy N' Escapade.


Saturday, 26 March 2016

蜜汁三文鱼 Honey Glazed Salmon

最近家里比较常买三文鱼,通常我都是以照烧或干煎的方式煮。这次我用了比较特别的酱汁来煮,酱汁是以蜂蜜和酱油调成的,煮法有点类似照烧,不过却没加入清酒和味醂。这蜜汁三文鱼煮了两次才成功,第一次时我参考一些食谱,用蜜汁腌制三文鱼然后才煎,不过可能是因为有蜂蜜的关系,外皮很快就煎得焦掉了。所以第二次我就决定不要用蜜汁腌制,直接将三文鱼煎至金黄色后才加入蜜汁一起煮。这煮法比较简单,而且煮出来的三文鱼卖相也比较美。那天中午准备了一顿丰富的午餐,除了有蜜汁三文鱼外,我还准备了西兰花、红萝卜及糙米饭一起搭配。


蜜汁三文鱼 


材料:
三文鱼 1块
橄榄油 1汤匙

蜜汁:
蜂蜜 3汤匙
酱油 3汤匙
蒜茸 1/2茶匙
姜茸 1/2茶匙

装饰:
芫茜碎 少许

做法:
1. 将三文鱼洗净抹干,把盐和黑胡椒涂抹在三文鱼的两面。在一个平底锅里加入橄榄油,以中高火烧热,加入三文鱼,煎至两面都呈金黄色,每面煎大约2分钟,盛出备用。

2. 把蜜汁的材料加入平底锅里,以中火煮滚,转至小火,然后将三文鱼放回平地锅里。用汤匙勺蜜汁淋在三文鱼上,继续煮大约2-3分钟,直到蜜汁煮至浓稠及三文鱼煮至熟透。

3. 将三文鱼盛碟,撒上少许芫茜碎作装饰,伴与川烫过的西兰花和红萝卜及糙米饭一起享用。


备注:
*烹煮的时间视鱼的厚度而定,请自行调整。


Honey Glazed Salmon

Ingredients:
1 salmon fillet
1 tbsp olive oil

Honey Glaze:
3 tbsp honey
3 tbsp soy sauce
1/2 tsp minced garlic
1/2 tsp minced ginger

For Garnish:
Some chopped coriander

Methods:
1. Rinse the salmon fillet and pat dry. Season the salmon fillet with salt and black pepper on both sides. Heat olive oil in a pan over medium high heat, add salmon fillet and sear both sides until golden brown, about 2 minutes each side. Dish out and set aside.

2. Pour the honey glaze ingredients to the pan, and bring to boil over medium heat. Turn to low heat, then add salmon fillet to the pan, and spoon the honey glaze over the salmon. Cook for 2-3 minutes until the honey glaze is thickened and the salmon is completely cooked through.

3. Transfer the salmon fillet to serving plate, garnish with some chopped coriander. Serve with blanched broccoli, carrot and brown rice.


Note:
*The time of cooking is depending on the thickness of the salmon fillet, please adjust accordingly.


This post is linked to the event Little Thumbs Up (Mac 2016 : Honey) organised by Zoe from Bake for Happy Kids and Doreen from My Little Favourite DIY and hosted by Joyce from Joy N' Escapade.


Saturday, 20 February 2016

CNY Dishes # 4 - 齐声庆贺笑哈哈 | 奶香腰果虾 Creamy Prawns with Cashew Nuts

今年的“笑哈哈”一波三折,一开始时是打算准备这道奶香腰果虾作为年菜,也曾试煮了一次,不过不是很成功,所以就换了另一个食谱,荔茸凤尾虾。新年前小宝贝进了院,住了好几天,到年二十七时才从医院回来,原还不打算准备团圆午饭了,过后又放不下心,赶紧准备材料,终于都来得及准备之前计划好的海味一品锅鱼鳔猪肚汤。而工序比较多而且难准备的荔茸凤尾虾就改为简单的金银蒜粉丝蒸虾。金银蒜粉丝蒸虾的味道虽不错,不过食谱还有待改进,再加上当天拍的照片实在太差强人意,所以就不上帖子了。


过完年初七后我就比较得空,所以我就重新写过奶香腰果虾的食谱,调整食材的份量,看改良后煮出来的效果会不会比较好,因为之前住出来的酱汁太湿,让虾无法沾上腰果。年初七与娘家聚餐时吃到一道很不错的泰式虾,虾先炸过然后再裹上带点微橙的奶白酱汁,没猜错的话应该是用了美乃滋和泰式辣椒酱。虽然曾经考虑过用美乃滋来煮酱汁,让虾容易沾上腰果,不过家人却不吃美乃滋,所以我就改为淡奶加切达芝士,将酱汁煮得浓稠,效果和用美乃滋也差不多。奶香芝士香还有麻疯柑叶的香,配搭香脆的炸腰果碎,我终于成功煮出今年的“笑哈哈”年菜了。虾寓意着笑哈哈,希望家人吃了虾,在新的一年里每天都笑哈哈。


奶香腰果虾

材料:
中虾 350克(剪须脚,去肠泥)
牛油 1汤匙
蒜茸 1汤匙
指天椒 1条(切圈)
麻疯柑叶 2片,切幼丝
淡奶 80毫升
切达芝士 1片
腰果 50克 (烤香切碎)
粟粉 适量

调味料:
盐 1/4茶匙
糖 1 1/2茶匙

做法:
1. 在一个锅里烧热适量的油。将虾裹上粟粉,放入油锅里炸至熟,捞出备用。

2. 在一个平底锅里,以中火烧热牛油。加入蒜茸、指天椒及麻疯柑叶爆香。加入淡奶、切达芝士及调味料,然后煮至芝士溶化。加入炸好的虾和腰果碎,拌炒至均匀即可。盛碟,趁热享用。


份量:3至4人


Creamy Prawns with Cashew Nuts

Ingredients:
350 g medium prawns, trimmed and deveined
1 tbsp butter
1 tbsp minced garlic
1 bird's eye chili, chopped
2 kaffir lime leaves, finely shredded
80 ml evaporated milk
1 slice of Cheddar cheese
50 g cashew nuts, toasted and chopped
Some cornstarch

Seasoning:
1/4 tsp salt
1 1/2 tsp sugar

Method:
1. Heat enough oil in a wok for deep-frying. Coat the prawns with some corn starch and deep fry in hot oil until cooked. Dish out and set aside.

2. In a pan, heat butter over medium heat. Add garlic, bird's eye chili and kaffir lime leaves, saute until fragrant. Add evaporated milk, Cheddar cheese and seasoning, cook until the cheese is melted. Add prawns and chopped cashew nuts, stir until well combine. Transfer the prawns to a serving plate. Serve immediately.


Servings: 3 - 4


This post is linked to Cook and Celebrate: CNY 2016 organised by Yen from GoodyFoodies, Diana from Domestic Goddess Wannabe and Zoe from Bake for Happy Kids.


Friday, 16 October 2015

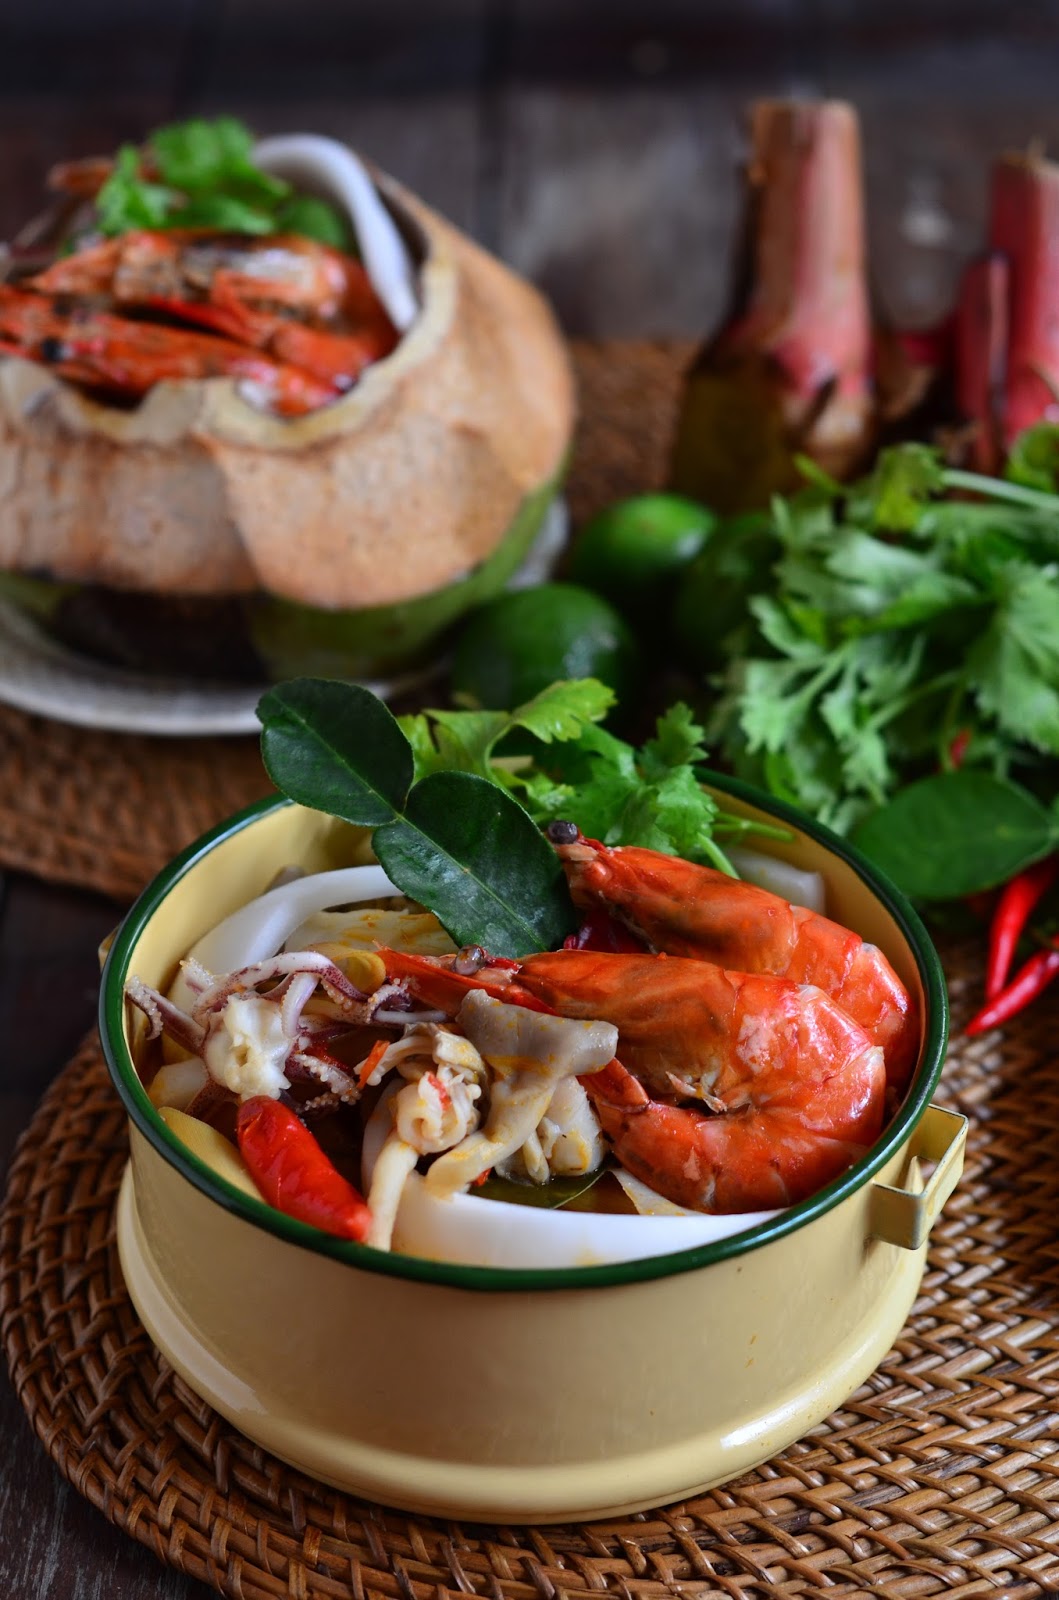
椰香海鲜冬荫汤 Seafood Tom Yum with Coconut

从小宝贝可以和我们一起用餐后,我和老公就很少在外吃辛辣的食物,多数都会找一些适合她的地方用餐。酸酸辣辣的冬荫汤已有好久没吃了,看回以前的帖子,突然想念起椰香冬荫功的味道了。买了粒椰子在家煮了锅海鲜版的冬荫汤,不但可以解嘴馋,还可以让我从新拍些照片,因为之前拍的那些照片实在有点差强人意。


今天就是第一天没有帮佣的日子,暂时看来还可以应付,不过就需要好好策划我的时间。虽然说之前也有试过需要自己做家务,不过近两年多来家务都有帮佣代劳,所以我都一直处于比较轻松的状态。由于现在有了小宝贝,再加上小朋友肯定不会乖乖地坐在那里等你做完家务,所以吸尘方面就买了架机器人吸尘器代劳,这一来就节省了一些时间,也可以确保地上时常保持干净。以后可能就得花多一点时间在家务上,上部落格的时间就需逐渐减少了。


椰子是在Aeon 买的,现点现开,
负责开椰的工人将整个椰肉球完美地取出,
看了真的让人满心欢喜。


椰香海鲜冬荫汤

材料:
老虎虾 8只(去肠泥,保留虾壳及尾部)
墨鱼 350克(去内脏,洗净,切圈)
香茅 4支(斜切片)
南姜 5片
疯柑叶 6叶(撕半)
灰蚝菇 150克
金针菇 150克
嫩粟米 100克
朝天椒 3个(稍微拍一拍)
鱼露 1/3杯或适量
青柠汁 1/3杯或适量
泰式辣椒酱 3汤匙或适量
新鲜椰浆 1杯
新鲜嫩椰子 1粒(取椰肉及椰水,椰子保留下来当做盅,椰水大约1 1/2杯)
虾高汤 5杯
芫茜 适量

份量:4人

做法:
1. 将椰水和虾高汤倒入汤锅里,以大火煮至滚,然后调至小火,加入香茅,南姜和疯柑叶煮15分钟至香味出。然后再拌入泰式辣椒酱,加入指天椒和以鱼露调味。

2. 调至中火,加入金针菇、灰蚝菇和嫩玉米,煮2-3分钟。把虾和墨鱼加入,继续大约煮1分钟。倒入椰浆,煮至滚。熄火,倒入青柠汁和加入椰肉,搅拌均匀即可。盛在碗里,撒上芫茜,伴与白饭,乘热享用。


Seafood Tom Yum with Coconut 

Ingredients:
8 tiger prawn, cleaned, deveined and trimmed, keep the shells and tail intact
350 g squids, cleaned and cut into rings
4 stalks lemongrass, sliced diagonally
5 slices fresh galangal
6 kaffir lime leaves, torn into pieces
150g grey abalone mushroom
150g enoki mushrooms, ends trimmed
100g baby corns
3 fresh red bird’s eye chilies, crushed
1/3 cup fish sauce, or to taste
1/3 cup fresh lime juice, or to taste
3 tbsp Nam Prik Pao, or to taste
1 cup fresh coconut milk
1 fresh young coconut, pour out the coconut juice and scoop out the flesh, reserve the shell for later use (about 1 1/2 cup coconut juice)
5 cups prawn stock
Cilantro leaves, for garnishing

Methods:
1. Pour the coconut juice and prawn stock into a pot, bring the stock to boil. Turn to low heat, add lemongrass, galangal, and kaffir lime leaves, simmer for 15 minutes until fragrant. Then stir in the Nam Prik Pao, add the bird’s eye chilies and season with fish sauce.

2. Turn to medium heat, add enoki mushrooms, grey abalone mushroom and baby corns, cook for 2-3 minutes. Add prawns and squid, cook for about 1 minute. Add coconut milk and cook till boil. Turn off the heat, add in the lime juice and coconut flesh. Stir to combine well. Transfer to serving bowls. Garnish with some cilantro leaves. Serve immediately with steamed rice.


This post is linked to the event Little Thumbs Up (Oct 2015 : Coconut) organised by Zoe of Bake for Happy Kids and Doreen of My Little Favourite DIY and hosted by Jess from Bakericious.


Sunday, 4 October 2015

香辣臭豆虾 Sambal Udang Petai | Sambal Prawns with Stink Beans

好久都没吃臭豆了,那天炒了好多的椰香叁巴辣椒酱,所以就拿了些来炒臭豆和虾。我参考了Sonia的小贴士,预先川烫了臭豆和炒虾,再加上自制的椰香叁巴辣椒酱,煮出来的香辣臭豆虾果然比较好吃,配饭吃真的是超赞!


香辣臭豆虾

材料:
中虾 12只(去头去壳,保留尾部,挑去泥肠,洗净备用)
臭豆 100 克(去芯)
洋葱 1粒(切片)
椰香叁巴辣椒酱 3/4杯
水 1/4杯
鱼露 1汤匙,或适量
糖 1茶匙,或适量
有机纯椰子油 3汤匙

做法:
1. 煮一小锅滚水,放入臭豆川烫大约30秒,捞起沥干备用。
2. 加入1汤匙的椰子油在平底锅里,以中火烧热。放入虾炒大约45秒或至几乎熟即可盛出备用。
3. 在同一个锅里再添加2汤匙的椰子油,加入洋葱片拌炒大约1-2分钟,然后加入椰香叁巴辣椒酱和水,拌炒至均匀。
4. 把臭豆和虾加入,快速拌炒一下。加入鱼露和糖调味,即可熄火。盛出,伴与白饭或椰浆饭乘热享用!


Sambal Udang Petai | Sambal Prawns with Stink Beans

Ingredients:
12 medium prawns, deveined and shelled but leave tails intact
100 g stink beans / petai, peeled and halved
1 onion, sliced
3/4 cup sambal tumis with coconut oil
1/4 cup water
1 tbsp fish sauce, or to taste
1tsp sugar, or to taste
3 tbsp organic extra virgin coconut oil

Method:
1. Bring a small pot of water to boil and blanch the stink beans for about 30 seconds. Drain and set aside.
2. Heat 1 tbsp of coconut oil in a frying pan over medium heat. Add prawns and stir fry for about 45 seconds or until almost cooked, dish up and set aside.
3. In the same frying pan, add 2 tbsp of coconut oil. Add onion slices and stir fry for 1 - 2 minutes. Add sambal tumis and water, stir fry till well combine.
4. Add stink beans and prawns, quickly stir fry. Season with fish sauce and sugar. Dish out and serve hot with white rice or Nasi Lemak.


This post is linked to the event Little Thumbs Up (Oct 2015 : Coconut) organised by Zoe of Bake for Happy Kids and Doreen of My Little Favourite DIY and hosted by Jess from Bakericious.


Thursday, 27 August 2015

鲜虾腐皮卷 Prawn Rolls With Beancurd Skin (空气炸锅版 / Air Fryer Version)

到点心茶楼老公必点的第一样点心就是鲜虾腐皮卷,炸得脆脆的腐皮,再加上爽口弹牙的虾肉,就算是油炸的点心,我看也没多少人可以抗拒。其实鲜虾腐皮卷看起来蛮容易做的,刚巧家婆又帮我买到淡腐皮,我也从超市里买到了一些新鲜的虾回来,所以就赶紧动手做鲜虾腐皮卷。鲜虾腐皮卷做好后可以冷冻起来,要吃时直接取出来炸就行了。原本想了好久要油炸好还是用空气炸锅炸好,到最后小宝贝睡迟了,为了快点完成晚餐,所以只好选择用空气炸锅来炸鲜虾腐皮卷。没想效果还不错,只需短短的5分钟的时间就可以将腐皮炸得脆脆的。我也蛮喜欢吃鲜虾腐皮卷,可是在外面吃的都很油,吃多了就会觉得很腻,现在可好啦,只需用空气炸锅就可以解决这个问题。


每次点鲜虾腐皮卷,附上的蘸酱都是美乃滋,可是我就不是很喜欢。我曾在一家比较传统的酒家试过一个很较特别的蘸酱,这个蘸酱黑黑的,原以为是酱油,试过后发觉味道是带酸的,可是又不像黑醋那么酸,过后想了好久才发觉这是喼汁的味道。味道微酸的喼汁和鲜虾腐皮卷和搭配,如果嫌配美乃滋比较腻的话,偶尔也可以尝试喼汁蘸酱。


隔天中午我又炸了几条鲜虾腐皮卷来拍照,
拍完照后就拿来当午餐吃。
香脆的鲜虾腐皮卷,
加上一碗清凉的海底椰龙眼糖水,
虽然简单,可是却很满足。


用空气炸锅的好处是只需用少许油,
不过炸的过程中却很难确保鲜虾腐皮卷的形状会炸得美美的。
看我的鲜虾腐皮卷的两端都炸得卷了起来。


鲜虾腐皮卷

材料:
去壳虾肉 250克(30只中虾,去肠泥)
淡腐皮 12张(尺寸15cm X 13cm)
蛋白 少许

腌料:
白胡椒粉 1/4茶匙
盐 1/3茶匙或更多
黄糖 1/4茶匙
麻油 1茶匙
粟粉 2 1/2汤匙
蛋白 1/2个

做法:
1. 把虾洗净,沥干水份,然后用厨房纸巾抹干。
2. 用腌料腌制虾,收入冰箱腌制30分钟。
3.  取一张腐皮,用一块清洁的湿布轻轻地抹一抹,放入2只虾在腐皮中间。用少许蛋白搽于腐皮四边,然后将腐皮卷起来,用手轻压两端封口即可。一直重复做法直到用完所有馅料。
4. 把空气炸锅预热至180°C。扫上少许油在腐皮卷表面,然后把腐皮卷铺排在空气炸锅的烤盘或炸篮里,炸大约5分钟或直到炸成金黄色。盛出排盘,伴与辣椒酱或喼汁乘热享用!


备注:
*炸的时间视虾的大小而定,请自行调整。


Prawn Rolls With Beancurd Skin

Ingredients:
250 g shelled prawns (30 medium prawns), deveined
12 pieces bean curd skin, size 15cm X 13cm
Some egg white

Marinade:
1/4 tsp white pepper powder
1/3 tsp salt, or more to taste
1/4 tsp brown sugar
1 tsp sesame oil
2 1/2 tbsp cornflour
1/2 egg white

Method:
1. Wash the prawn, drain and pat dry with kitchen towel.
2. Marinate the prawns with marinade for 30 minutes in the refrigerator.
3. Place a piece of the beancurd skin on a flat surface, wipe the beancurd skin carefully using a damp cloth to soften it. Place 2 prawns in the middle of the beancurd skin. Brush some egg white on the edges of the beancurd skin. Roll up the beancurd skin and press both sides to seal the rolls.
4. Preheat air fryer to 180°C. Brush some oil on the prawn rolls, then arrange the prawn rolls on the air fryer grill pan / basket. Air fry the prawn rolls for about 5 minutes or until the prawn rolls are golden brown. Dish out and serve hot with chilli sauce or worcestershire sauce.


Note:
*The time of frying is depending on the size of the prawns, please adjust accordingly.


I'm submitting this post to the Best Recipes for Everyone August 2015 Event (BREE# 12 Dim Sum) organized by Fion of XuanHom's Mom and co-hosted by May (厨苑食谱).


This post is also linked to the event Little Thumbs Up (Aug 2015 : Brown Sugar and Molasses) organised by Zoe of Bake for Happy Kids and Doreen of My Little Favourite DIY and hosted by Jess from Bakericious.


Related Posts Plugin for WordPress, Blogger...