Tuesday 10 May 2016

抽奖活动揭晓了!


不好意思,让大家久等,谢谢大家的参与,《紫羅蘭的爱心厨房》部落格四周年庆的抽奖活动终于揭晓了,以下是幸运儿的名单。


1. Choi Yen - mimid3v***@yahoo.com
2. Alice Goh - alice_go***@yahoo.com
3. Shirlyn Lee - augj***@gmail.com
4. Susan Lin - susanlin8***@yahoo.com
5. Chua Hwee Yong - marie230***@yahoo.com
6. Cheah Pei San - potato***@hotmail.com
7. Connie Chong - wycon***@gmail.com
8. Mei Wong - chiewmeiw***@hotmail.com
9. Lim Yi Xin - yxlim***@gmail.com
10. S C Lim - aprilb***@gmail.com
11. Tang Sui Sum - susantang0***@gmail.com
12. Jacqueline Cho - jac88***@yahoo.com
13. Daisie Ng - daisie.car***@yahoo.com
14. Lisa Chang - lisa***@gmail.com
15. Khor Lee Ling - khorleel***@gmail.com


Thursday 28 April 2016

紫蓝色梦幻蝶豆花茶 Butterfly Pea Flower Tea | 部落格四周年庆&抽奖活动 4th Blog Anniversary & Giveaway

转眼又到了部落格周年庆,今年已经是第四年了。往年的周年庆都以可食用的花卉为主题,今年也不例外,今年我选了蝶豆花(蓝花)为主题。自从做了蓝花龙眼燕菜后,就被那天然的蓝色给吸引住,之后看了网上的一些资料,原来蝶豆花汁遇酸就会变成紫色,只需在蝶豆花汁里加入少许柠檬汁就会变成梦幻紫色,实验了几次后终于成功了,可以做到紫蓝色梦幻蝶豆花茶。


之前曾提到家里有一盆蝶豆花,没想到上了蓝花龙眼燕菜的帖子不久后就开始开花了,一朵朵蓝色的花朵真的好迷人。一般看到的蝶豆花都是单瓣的,不过我却没想到家里的那盆蝶豆花原来是重瓣蝶豆,网上的资料提到这种重瓣蝶豆是园艺栽培种,现在蝶豆花已经开花了,希望很快会有豆荚。最近几天家里那盆蝶豆花每天都会开不少花,每次看到的都是重瓣的蝶豆花,不过偶然发现有一两朵单瓣的蝶豆花,真的很特别。单瓣的蝶豆长得像蝴蝶一样,而重瓣的蝶豆像玫瑰,无论是单瓣或重瓣的蝶豆花都有各自的美态。


早前姐姐给了我很多单瓣蝶豆花的豆荚及种子,不过数量太多了,我也不需要用到这么多种子,所以想趁着部落格周年庆,将这些单瓣蝶豆花的豆荚送给大家,详情请往下看。献上紫蓝色梦幻蝶豆花茶给大家,感谢大家的支持,感谢这一路上都有你们的陪伴!


Happy Blog Anniversary!


单瓣蝶豆花


重瓣蝶豆花


这些照片是以手机拍的,拍出来的蝶豆花看起来颜色偏紫。
其实种蝶豆花并不需要有很大的地方,放在中型花盆里栽种也行。


左:单瓣蝶豆花 On the Left: Single layer/petal butterfly pea flower
右:重瓣蝶豆花 On Right: Double-flowered butterfly pea flower


最近我和小宝贝种了一盆单瓣蝶豆花,由小宝贝负责撒种子,
没想到才几天就开始发芽了。现在已经是第十七天了,
叶子也长得越来越多,很快就需要换大一点的花盆了。


紫蓝色梦幻蝶豆花茶

材料:
饮用水
新鲜柠檬汁
冰块 适量

蝶豆花糖浆:
水 1杯
糖 1杯
新鲜蝶豆花 30克

做法:
1. 蝶豆花糖浆:
在一个小锅中加入水、糖和蝶豆花煮滚,转至小火,煮3分钟,然后从火炉上移开,把糖浆过滤,放置一旁让其冷却至室温,然后收入冰箱了冷藏。

2. 在玻璃杯里装入冰块,加入2汤匙的蝶豆花糖浆,然后加入适量的饮用水。最后加入柠檬汁,搅拌至均匀,即可饮用!


Butterfly Pea Flower Tea

Ingredients:
Drinking water
Fresh lemon juice
Some ice cubes

Butterfly Pea Flower Syrup:
1 cup water
1 cup sugar
30g fresh butterfly pea flowers, rinsed

Methods:
1. Butterfly Pea Flower Syrup:
In a saucepan add water, sugar and butterfly pea flowers. Bring to boil then turn to low heat, cook for 3 minutes. Remove from heat, strain the syrup through a fine strainer to remove the flowers. Set aside and let it cool down to room temperature. Chill in refrigerator until ready to serve.

2. To serve: 
Fill the glass with some ice cubes. Add about 2 tbsp of Butterfly Pea Flower Syrup and pour the drinking water into the glass. Add lemon juice to taste, stir well. Serve immediately.


**************************************************************************************************************************


蝶豆花的功效良多,欲知更多请看这里这里


上:蝶豆花的叶子、单瓣蝶豆花
下(左起):成熟的豆荚、豆荚内的种子、干燥的蝶豆花


今年的部落格的周年庆我准备了一些礼物送给一路来支持《紫羅蘭的爱心厨房》的朋友们(只限居住在马来西亚和新加坡的朋友)。今年的礼物是十五份的单瓣蝶豆花的豆荚,参加抽奖的方式很简单,只需在这帖子里留言,留下您的名字和电邮地址,截止日期是05.05.16(星期四)。祝你好运!


I have prepared some special gift for you for being so supportive to my blog, Violet's Kitchen. I would like to giveaway 15 packets of butterfly pea flower seed pods and this giveaway is opened for those residing in Malaysia and Singapore only. To enter the giveaway, kindly leave you name and email in the comment section of this post. Closing date will be on Thursday, 5th May 2016. Good Luck!


Thursday 31 March 2016

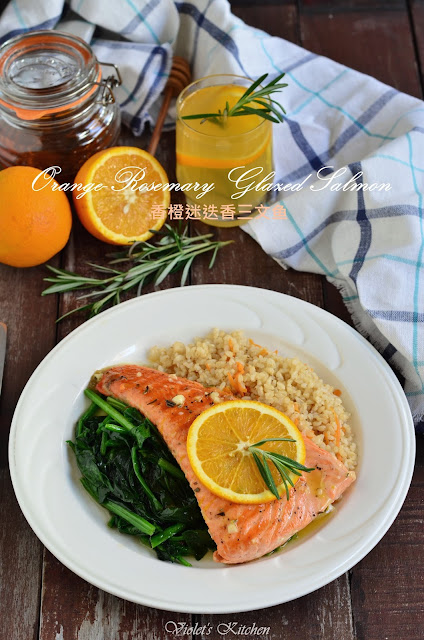
香橙迷迭香三文鱼 Orange-Rosemary Glazed Salmon

蜜汁三文鱼后,昨天我又再尝试煮新口味的三文鱼,香橙迷迭香三文鱼。以香橙和迷迭香煮的酱汁吃起来酸酸甜甜的,蛮开胃的,味道也和三文鱼很搭配。昨天的晚餐除了香橙迷迭香三文鱼外,我还准备了炒菠菜及糙米饭。最近每个星期至少煮一次糙米饭,晚餐时的蔬菜也多煮些,希望家人可以吃得健康点。我家里最喜欢吃糙米饭的就是小宝贝了,每次都吵着我要煮糙米饭,可是我不敢煮这么多次,怕家婆接受不到。我家小宝贝一看到三文鱼就很开心了,可惜她却不喜欢这个新煮法,吃晚餐时看到我把额外的酱汁淋在鱼上就一直告诉我说不要酱汁,过后我只好拨开外面的那层,取里面的鱼肉给她。和之前的蜜汁三文鱼相比,小宝贝会比较喜欢之前的蜜汁三文鱼,加上当天我煮了藜麦饭,她一口接一口地吃个不停。看来我还得花些功夫,多煮些不同的食物让她尝试和接受。


香橙迷迭香三文鱼 

(食谱参考Cooking Classy,作少许更改)

材料:
橄榄油 2汤匙
三文鱼 3块,厚约1寸(静置在室温下10分钟)
盐和现磨黑胡椒 适量
蒜头 2瓣(切碎)
新鲜迷迭香2 1/2茶匙(切碎)
鸡汤 1/4杯 + 1汤匙
橙皮茸 1/2茶匙
新鲜橙汁 2/3杯
柠檬汁 1汤匙
蜂蜜 3汤匙
粟粉 2 1/2茶匙

做法:
1. 以中高火烧热平底不沾锅。把盐和黑胡椒涂抹在三文鱼的两面。把橄榄油加入锅中烧热,然后加入三文鱼,煎至两面都呈金黄色,每面煎大约2分钟,盛出备用。

2. 在同一个平底不沾锅里加入蒜头和迷迭香,炒大约20秒,然后加入1/4杯鸡汤煨煮,直到大部份鸡汤蒸发了。拌入橙皮茸、橙汁、柠檬汁和蜂蜜。在一个小碗里加入1汤匙的鸡汤及粟粉,搅拌至均匀。将粟粉水倒入锅里,加入适量的盐和胡椒调味,煮至酱汁滚后继续小火煨煮1分钟,期间要不断搅拌。将三文鱼放回平地锅里用汤匙勺香橙迷迭香酱汁淋在三文鱼上

3. 将三文鱼盛碟,以香橙片及迷迭香装饰,伴与炒菠菜及糙米饭一起享用。


备注:
*烹煮的时间视鱼的厚度而定,请自行调整。


Orange-Rosemary Glazed Salmon

(Recipe adapted from Cooking Classy, with some minor adjustments)


Ingredients:
2 tbp olive oil
3 salmon fillets (1-inch thick), rested at room temperature 10 minutes
Salt and freshly ground black pepper
2 cloves garlic, minced
2 1/2 tsp minced fresh rosemary
1/4 cup + 1 tbsp chicken broth
1/2 tsp orange zest
2/3 cup fresh orange juice
1 tbsp fresh lemon juice
3 tbsp honey
2 1/2 tsp cornstarch


Methods:
1. Heat a large non-stick saute pan over medium-high heat. Season both sides of salmon with salt and pepper. Heat olive oil then add salmon and cook until browned on both sides and cooked through, about 2 minutes per side. Transfer to a plate, leaving oil in pan.

2. Add garlic and rosemary to pan and saute 20 seconds, then add 1/4 cup chicken broth and simmer until mostly reduced. Stir in orange zest, orange juice, lemon juice and honey. In a small bowl whisk together remaining 1 tbsp chicken broth with cornstarch. Pour into pan, season sauce with salt and pepper to taste then bring to a boil and allow to boil 1 minute, stirring constantly. Return salmon to pan, spoon sauce over salmon.

 3. Transfer the salmon fillet to serving plate, garnish with some orange slices and rosemary. Serve with stir fried spinach and brown rice.


Note:
*The time of cooking is depending on the thickness of the salmon fillet, please adjust accordingly.


This post is linked to the event Little Thumbs Up (Mac 2016 : Honey) organised by Zoe from Bake for Happy Kids and Doreen from My Little Favourite DIY and hosted by Joyce from Joy N' Escapade.


蜂蜜芥末沙拉酱 Honey Mustard Salad Dressing

记得几年前老公介绍了我吃卡疆炸鸡沙拉,这炸鸡沙拉令我一试难忘,过后每次到那间餐厅都会点这道沙拉。卡疆炸鸡沙拉的沙拉酱是以蜂蜜芥末调成的,味道酸酸甜甜的,与炸鸡沙拉一起吃非常搭配及清新,而且不会油腻。上星期的其中一个晚上,我准备了卡疆炸鸡沙拉配搭蜂蜜芥末沙拉酱当二人晚餐。虽然自制的卡疆炸鸡沙拉和餐厅的味道有点不同,不过老公说味道不错,不一定要和餐厅的做的一模一样,听到他那么说真的令我很开心,因为平常如果问他食物味道如何,他的答案永远都是一样,只有“OK”。


从网上找到蜂蜜芥末沙拉酱的做法都很不同,有些有加美乃滋,有些加入植物油,而另一些则加入酸奶油。最后我参考了一些有加入美乃滋的食谱,不过材料的份量方面我就自己调整,慢慢调至适合自己的口味。这蜂蜜芥末沙拉酱味道酸酸甜甜的,除了当沙拉酱外也适合当炸鸡块的蘸酱。


蜂蜜芥末沙拉酱

材料:
美乃滋 4汤匙
狄戎芥末酱 2汤匙
蜂蜜 2汤匙
柠檬汁 1汤匙

做法:
1. 
在一个中碗里混合所有材料,放入冰箱冷藏30分钟后即可食用。


份量:2人份


Honey Mustard Salad Dressing

Ingredients:
4 tbsp mayonnaise
2 tbsp Dijon mustard
2 tbsp honey
1 tbsp lemon juice

Method:
1. In a medium bowl, combine all ingredients. Chill for 30 minutes before serving.


Serving: 2


This post is linked to the event Little Thumbs Up (Mac 2016 : Honey) organised by Zoe from Bake for Happy Kids and Doreen from My Little Favourite DIY and hosted by Joyce from Joy N' Escapade.


海底椰马蹄竹蔗糖水 Sea Coconut, Water Chestnut and Bamboo Cane Drinks

上星期日趁小宝贝不用上课,我们一家就带着小宝贝去巴刹参观,没想到小宝贝可以六点多就起身和我们一起去。其实家里的鸡肉、鱼肉等食材的供应都还足够到下个星期,所以去巴刹只是纯碎让小宝贝见识不一样的东西。反正不需要买晚餐的食材,我就买些海底椰、马蹄和竹蔗来煮糖水。之前曾经煮过海底椰马蹄糖水竹蔗马蹄水,不过一次用三种材料海底椰、马蹄和竹蔗来煮就没有试过。除了这三种材料,我还再加入红萝卜、蜜枣和石蜂糖,煮出来的糖水非常清甜,冷热饮用皆适合。现在的天气热得令人受不了,最好是喝些糖水来解热消暑。


美味下午茶 ~ 年糕卷 + 海底椰马蹄竹蔗糖水


海底椰马蹄竹蔗糖水

材料:
竹蔗 700克
新鲜海底椰 600克
马蹄 300克
蜜枣2粒
红萝卜 1条(削皮切块)
香兰叶 6片(打结)
水 3公升
石蜂糖 250克(可依个人喜好调整糖份)

做法:
1. 将海底椰去皮,然后切薄片备用。把马蹄洗净去皮,将竹蔗擦洗干净,斩成3寸段,然后用杵稍微打烂,帮助释放竹蔗的味道。

2. 将3公升的水倒入锅里,加入竹蔗、海底椰、马蹄、蜜枣、红萝卜和香兰叶,以大火煮至沸后转小火煮大约1小时30分钟。

2. 加入石蜂糖,煮至糖溶化即可熄火。冷热享用皆可。


Sea Coconut, Water Chestnut and Bamboo Cane Drinks

Ingredients:
700g bamboo cane
500 g fresh sea coconuts
300 g water chestnut
2 honey dates
1 carrot, peeled and cut into chunks
6 pandan leaves, knotted
3 litres water
250 g honey rock sugar, or more to taste

Method:
1. Remove the sea coconut skin and slice thinly. Wash and remove the water chestnut skins. Wash and scrub bamboo canes, chop into 3 inches sections, smash with the pestle to help release the flavour.

2. Pour 3 litres of water into a pot, add bamboo cane, sea coconut, water chestnut, honey dates, carrot and pandan leaves, bring to boil over high heat, then turn to low heat and cook for 1 hour and 30 minutes.

3. Add honey rock sugar and cook until fully dissolved. Serve warm or chilled.


This post is linked to the event Little Thumbs Up (Mac 2016 : Honey) organised by Zoe from Bake for Happy Kids and Doreen from My Little Favourite DIY and hosted by Joyce from Joy N' Escapade.


Wednesday 30 March 2016

年糕卷 Spring Roll Nian Gao (空气炸锅版 / Air Fryer Version)

早前回娘家时妈妈给了我些年糕,我收在冰箱都几个星期了,直到现在才得空用这些年糕做糕点。我很喜欢吃炸番薯芋头年糕,不过传统的方式是裹上面糊用来油炸,虽然好吃,不过却很油腻。之前bookmark了Peng's Kitchen的年糕卷食谱,一看到照片时就被那一深一浅的紫色给吸引着。年糕卷是以春卷皮包着淡紫色的芋头和深紫色的紫薯,而最中间那一层就是年糕。我将包好的年糕卷涂上一层椰子油才放入用空气炸锅里炸,炸好的年糕卷非常香,而且不会油腻。年糕卷的外皮炸金黄香脆,芋头泥和紫薯泥的内馅香甜软绵,而年糕则香滑软Q,吃起来的口感丰富。这年糕卷可以准备多一些收入冰箱里冷冻,想吃时拿出来解冻,然后放入空气炸锅里炸就可以了,非常方便。


年糕卷 Spring Roll Nian Gao 

(食谱参考Peng's Kitchen,做少许更改)

材料:
年糕 300克(切2寸长段)
芋头 300克
紫番薯 300克
新鲜椰丝 50克
蜂蜜 3汤匙
盐 1/4茶匙
有机纯椰子油 2汤匙
春卷皮 适量
粟粉水 适量

做法:
1. 将芋头和紫番薯切片,蒸至软,然后趁热压烂。

2. 把1汤匙蜂蜜、1汤匙椰子油、新鲜椰丝和盐加入芋泥里,搅拌至均匀。把2汤匙蜂蜜和1汤匙椰子油加入番薯泥里,搅拌至均匀。

3. 取一张春卷皮,放入1汤匙芋泥和1汤匙紫薯泥,然后攤平,放入一条年糕。将春卷皮卷起,用粟粉水封口。

4. 把空气炸锅预热至180°C。以椰子油涂抹于年糕卷表面,然后把年糕卷排放在空气炸锅的烤盘里,炸大约10分钟。将温度提高至200°C,继续炸多3分钟或至香脆及呈金黄色即可。盛出,乘热享用!


备注:
*炸的时间视年糕卷的大小而定,请自行调整。

份量:21条


Spring Roll Nian Gao

(Recipe adapted from Peng's Kitchen, with some adjustments)

Ingredients:
300 g Nian Gao (sticky rice cake), cut into 2" long strips
300 g taro
300 g purple sweet potato
50 g fresh grated coconut
3 tbsp honey
1/4 tsp salt
2 tbsp organic extra virgin coconut oil
Spring roll wrappers
Cornstarch water to seal spring roll

Methods:
1. Slice taro & sweet potato and steam them until soft. Mash taro and sweet potato while its still hot.

2. Add 1 tbsp honey, 1 tbsp coconut oil , grated coconut and salt to the mashed taro and mix till well combined. Add 2 tbsp honey and 1 tbsp coconut oil to the mashed sweet potato and mix till well combined.

3. Place wrapper onto a flat surface. Place a tbsp of taro filling and a tbsp of sweet potato onto wrapper, lightly spread it out. Place 1 piece of nian gao over and wrap. Brush edges with cornstarch water before rolling up.

4. Preheat air fryer to 180°C. Brush some coconut oil on spring roll, then arrange them on the air fryer grill pan. Air fry the spring roll nian gao for 10 minutes. Then increase the temperature to 200°C, continue to air fry for about 3 minutes or until the spring rolls are crispy and golden brown. Dish out and serve warm.


Note:
*The time of frying is depending on the size of the spring roll nian gao, please adjust accordingly.


Yields: 21 rolls


This post is linked to the event Little Thumbs Up (Mac 2016 : Honey) organised by Zoe from Bake for Happy Kids and Doreen from My Little Favourite DIY and hosted by Joyce from Joy N' Escapade.


Saturday 26 March 2016

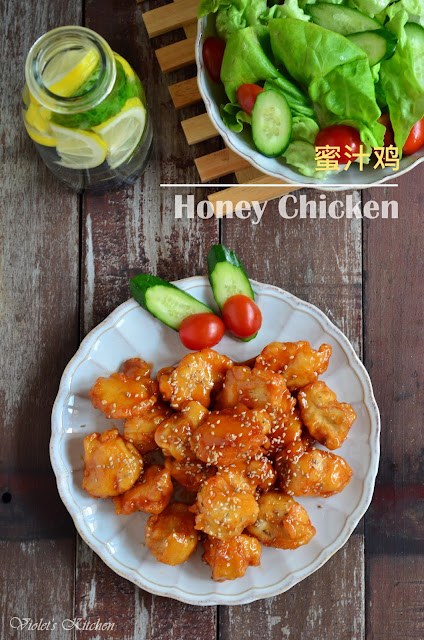
蜜汁鸡 Honey Chicken

早前找食谱时发现了The Art of Cooking的蜜汁鸡,这蜜汁鸡看起来很美味,我马上就将这食谱bookmark起来,列为必煮的食谱之一。果然这食谱没让我失望,鸡块外脆内软多汁,加上酸酸甜甜的蜜汁和芝麻,令人吃了一块接一块,停步不了口。不过这蜜汁鸡必须趁热吃,因为一旦冷了外皮就开始软,美味程度会大大下降。


蜜汁鸡

(食谱参考The Art of Cooking,作少许更改)

材料:
鸡胸肉 475克
盐 1/2茶匙
蒜粉 1/4茶匙
白胡椒粉 1/8茶匙
水 3汤匙

蜜汁:
番茄酱 5汤匙
糖 4汤匙
水 3汤匙
蜂蜜 2汤匙

面糊:
鸡蛋 1粒
盐 1/4茶匙
蒜粉 1/4茶匙
冷开水 10汤匙
小苏打粉 2茶匙
粟米粉 1/2杯
面粉 3/4杯
橄榄油 2汤匙

装饰:
烤香白芝麻 少许

做法:
1. 将番茄酱、糖、蜂蜜和水混合,调成蜜汁。

2. 把鸡肉的切成1寸的长条,然后每条切成1寸的块状。加入盐、白胡椒粉、蒜粉和水,混合均匀腌制15分钟。

3.将盐、蒜粉、鸡蛋、冷水和小苏打粉混合,然后再加入粟米粉和面粉,最后加入橄榄油,调成顺滑的面糊。把面糊倒入鸡肉里,混合均匀。

4. 把油预热至190℃,放入鸡肉炸大约1至1分钟30秒,将鸡肉捞出备用,然后继续炸另一批。

5. 当所有鸡肉都炸了一次后就将油加热至190℃,放入鸡肉再炸第二次,继续炸至金黄色。油炸的时间大约4-5分钟。一旦鸡肉炸至金黄色,将鸡肉捞出,沥干油份。

6. 把调好的蜜汁倒入锅里,加热至糖完全溶化。加入炸好的鸡肉块,搅拌均匀至鸡肉块裹上蜜汁即可。将蜜汁鸡盛碟,撒上少许烤香的白芝麻装饰,乘热享用。


份量:4人份


Honey Chicken

(Recipe adapted from The Art of Cooking, with some minor adjustments)

Ingredients:
475 g chicken breast
1/2 tsp salt
1/4 tsp garlic powder
1/8 tsp white pepper
3 tbsp water

Honey Sauce:
5 tbsp ketchup
4 tbsp sugar
3 tbsp water
2 tbs honey

Batter:
1 egg
1/4 tsp salt
1/4 tsp garlic powder
10 tbsp cold water
2 tsp baking powder
1/2 cup corn starch
3/4 cup flour
2 tbsp olive oil

For garnish:
Some toasted white sesame

Methods:
1. Make the sauce by combining the ketchup, sugar, honey and water and mix.

2. Cut the chicken in half, then into 1 inch strips. Cut each strips into 1 inch cubes. Add salt, white pepper, garlic powder and water. Mix and let the chicken marinate for 15 mins.

3. Make the batter by combine salt, garlic powder, egg, cold water, baking powder. Then add in corn starch, flour and vegetable oil last. Combine the chicken and batter together.

4. Preheat oil to 190℃ and fry the chicken for 1 minute to 1 minute 30 seconds, then remove and set aside. Fry the next batch.

5. Once all the chicken are pre-fried, add the chicken back into the 190℃ oil and continue to fry until golden brown. The total frying time is about 4-5 minutes. Once it turns golden brown, remove the chicken and drain.

6. Pour the sauce into a wok or pan and heat until the sugar is dissolve. Add the chicken in and coat it with the sauce. Dish out and transfer to serving plate. Garnish with some toasted white sesame. Serve immediately.


Servings: 4


This post is linked to the event Little Thumbs Up (Mac 2016 : Honey) organised by Zoe from Bake for Happy Kids and Doreen from My Little Favourite DIY and hosted by Joyce from Joy N' Escapade.


Related Posts Plugin for WordPress, Blogger...