Showing posts with label 家禽 Poultry. Show all posts

Saturday, 26 March 2016

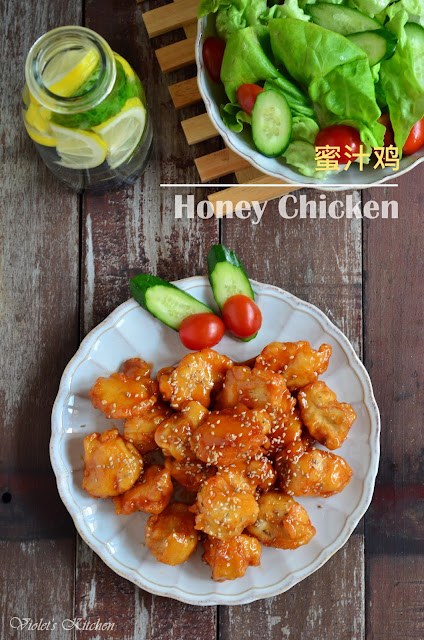
蜜汁鸡 Honey Chicken

早前找食谱时发现了The Art of Cooking的蜜汁鸡,这蜜汁鸡看起来很美味,我马上就将这食谱bookmark起来,列为必煮的食谱之一。果然这食谱没让我失望,鸡块外脆内软多汁,加上酸酸甜甜的蜜汁和芝麻,令人吃了一块接一块,停步不了口。不过这蜜汁鸡必须趁热吃,因为一旦冷了外皮就开始软,美味程度会大大下降。


蜜汁鸡

(食谱参考The Art of Cooking,作少许更改)

材料:
鸡胸肉 475克
盐 1/2茶匙
蒜粉 1/4茶匙
白胡椒粉 1/8茶匙
水 3汤匙

蜜汁:
番茄酱 5汤匙
糖 4汤匙
水 3汤匙
蜂蜜 2汤匙

面糊:
鸡蛋 1粒
盐 1/4茶匙
蒜粉 1/4茶匙
冷开水 10汤匙
小苏打粉 2茶匙
粟米粉 1/2杯
面粉 3/4杯
橄榄油 2汤匙

装饰:
烤香白芝麻 少许

做法:
1. 将番茄酱、糖、蜂蜜和水混合,调成蜜汁。

2. 把鸡肉的切成1寸的长条,然后每条切成1寸的块状。加入盐、白胡椒粉、蒜粉和水,混合均匀腌制15分钟。

3.将盐、蒜粉、鸡蛋、冷水和小苏打粉混合,然后再加入粟米粉和面粉,最后加入橄榄油,调成顺滑的面糊。把面糊倒入鸡肉里,混合均匀。

4. 把油预热至190℃,放入鸡肉炸大约1至1分钟30秒,将鸡肉捞出备用,然后继续炸另一批。

5. 当所有鸡肉都炸了一次后就将油加热至190℃,放入鸡肉再炸第二次,继续炸至金黄色。油炸的时间大约4-5分钟。一旦鸡肉炸至金黄色,将鸡肉捞出,沥干油份。

6. 把调好的蜜汁倒入锅里,加热至糖完全溶化。加入炸好的鸡肉块,搅拌均匀至鸡肉块裹上蜜汁即可。将蜜汁鸡盛碟,撒上少许烤香的白芝麻装饰,乘热享用。


份量:4人份


Honey Chicken

(Recipe adapted from The Art of Cooking, with some minor adjustments)

Ingredients:
475 g chicken breast
1/2 tsp salt
1/4 tsp garlic powder
1/8 tsp white pepper
3 tbsp water

Honey Sauce:
5 tbsp ketchup
4 tbsp sugar
3 tbsp water
2 tbs honey

Batter:
1 egg
1/4 tsp salt
1/4 tsp garlic powder
10 tbsp cold water
2 tsp baking powder
1/2 cup corn starch
3/4 cup flour
2 tbsp olive oil

For garnish:
Some toasted white sesame

Methods:
1. Make the sauce by combining the ketchup, sugar, honey and water and mix.

2. Cut the chicken in half, then into 1 inch strips. Cut each strips into 1 inch cubes. Add salt, white pepper, garlic powder and water. Mix and let the chicken marinate for 15 mins.

3. Make the batter by combine salt, garlic powder, egg, cold water, baking powder. Then add in corn starch, flour and vegetable oil last. Combine the chicken and batter together.

4. Preheat oil to 190℃ and fry the chicken for 1 minute to 1 minute 30 seconds, then remove and set aside. Fry the next batch.

5. Once all the chicken are pre-fried, add the chicken back into the 190℃ oil and continue to fry until golden brown. The total frying time is about 4-5 minutes. Once it turns golden brown, remove the chicken and drain.

6. Pour the sauce into a wok or pan and heat until the sugar is dissolve. Add the chicken in and coat it with the sauce. Dish out and transfer to serving plate. Garnish with some toasted white sesame. Serve immediately.


Servings: 4


This post is linked to the event Little Thumbs Up (Mac 2016 : Honey) organised by Zoe from Bake for Happy Kids and Doreen from My Little Favourite DIY and hosted by Joyce from Joy N' Escapade.


Thursday, 24 March 2016

蜂蜜酱油烤鸡翅 Honey Soy Chicken Wings (空气炸锅版 / Air Fryer Version)

每次准备二人晚餐事我都喜欢选择一些较简单的食物,通常都是一份肉类再加些生菜沙拉的组合。前几天我准备了一些蜂蜜酱油烤鸡翅当晚餐,以蜂蜜和酱油腌制的鸡翅吃起来微咸带甜,撒上一些白芝麻一起吃,味道更香更美味。除了蜂蜜酱油烤鸡翅,我还准备了一大碗清新的生菜沙拉和蜂蜜柠檬水,简简单单的轻便晚餐就完成了。


蜂蜜酱油烤鸡翅

材料:
鸡翅 500克

腌料:
蜜糖 2汤匙
酱油 1汤匙
蚝油 1汤匙
麻油 1汤匙
绍兴酒 1/2汤匙
胡椒粉 1/8茶匙
姜汁 1/4茶匙

涂抹酱汁:
蜜糖 1汤匙
酱油 1/2汤匙

装饰:
白芝麻 1/2汤匙(烤香)
青葱粒  1/2汤匙

做法:
1. 以腌料将鸡翅腌制至少4小时或放入冰箱至过夜。
2. 把空气炸锅预热至160°C。将鸡翅铺排在空气炸锅的烤盘里,然后烤7分钟。7分钟后将鸡翅翻过另一面,再烤3分钟。
3. 在一个小碗里混合涂抹酱汁,然后涂抹于鸡翅的两面,放进空气炸锅里再烤1-2分钟或直到蜂蜜开始焦糖化即可。盛出排盘,撒上白芝麻和青葱粒即可享用!


备注:
*烤的时间视鸡翅的大小而定,请自行调整。


份量:2-3人份


Honey Soy Chicken Wings

Ingredients:
3 chicken whole legs

Marinade:
2 tbsp honey
1 tbsp soy sauce
1 tbsp oyster sauce
1 tbsp sesame oil
1/2 tbsp Shao Xing wine
1/8 tsp white pepper powder
1/4 tsp ginger juice

Honey Soy Basting Sauce:
1 tbsp honey
1/2 tbsp soy sauce

For garnish:
1/2 tbsp white sesame, toasted
1/2 tbsp chopped spring onion

Method:
1. Add all the marinade ingredients to the chicken wings and marinate for at least 4 hour or overnight in the fridge.

2. Preheat air fryer to 160°C. Transfer the chicken wings to the air fryer grill pan. Bake the chicken wings for 7 minutes, then turn the chicken wings over and bake for another 3 minutes.

3. In a small bowl, combine honey and soy sauce. Baste the chicken wings with honey glaze. Bake the chicken wings for another 1-2 minutes or until honey glaze starts to caramelize. Transfer to serving plate. Sprinkle with sesame seeds and spring onion. Serve immediately.


Note:
*The time of baking is depending on the size of the chicken, please adjust accordingly.


Servings: 2-3


This post is linked to the event Little Thumbs Up (Mac 2016 : Honey) organised by Zoe from Bake for Happy Kids and Doreen from My Little Favourite DIY and hosted by Joyce from Joy N' Escapade.


Sunday, 28 February 2016

五味菊花鸡 Fried Chicken with Honey Chrysanthemum Sauce

吃了一道菊花鸡肉卷,再请大家吃一道五味菊花鸡。两道菜肴都是以菊花为主,一道清蒸,一道酥炸,菊花鸡肉卷是将鸡肉以菊花清蒸,而五味菊花鸡则是炸鸡块配蜂蜜菊花酱汁。五味菊花鸡里的鸡肉是以青柠汁、盐和糖腌制过,然后再放入油锅里炸得酥酥脆脆的,配上清香甘甜的酱汁,吃起来的味道非常特别,充满层次感。

鸡胸肉块刚炸好的时外脆内多汁,不过放置久了后吃起来就会比较硬,如果不是马上吃的话就建议用鸡腿肉,因为就算放久了吃起来也不会太硬。酥酥脆脆的炸鸡块非常好吃,不过吃多的就会非常热气,所以我又煮了锅罗汉果菊花茶来清凉解热一下。五味菊花鸡加汉果菊花茶,简单的晚餐就完成了!


五味菊花鸡

(食谱参考《最美味鸡肉佳肴》,第102页,做少许更改)

材料:
鸡胸肉 2副(切小块状)
粟粉 适量

腌料:
青柠汁 1 1/2汤匙
盐 1 1/2茶匙
糖 1 1/2茶匙

酱汁:
胎菊 10克
甘草 3片
水 380毫升
蜜糖 3汤匙

勾芡:
粟粉 2茶匙 + 水 2汤匙 (拌匀)

做法:
1. 在意给小锅里加入水煮滚,然后加入菊花及甘草,转制中小火煮2分钟。加盖让胎菊浸泡在水里5分钟,然后滤渣,加入蜜糖拌匀备用。
2. 鸡胸肉加入腌料腌2小时,然后裹上一层粟粉,放入油锅里炸至香脆及呈金黄色即可捞起。
3.把酱汁煮滚,加入芡水勾芡,煮至酱汁浓稠即可熄火。把酱汁淋在炸好的鸡块上即可享用。


Fried Chicken with Honey Chrysanthemum Sauce

(Recipe adapted from 《A Passion for chicken》, pg.102, with some minor adjustments)

Ingredients:
4 boneless and skinless chicken breast, cut into bite-size pieces
Some cornstarch for coating

Marinade:
1 1/2 tbsp lime juice
1 1/2 tsp salt
1 1/2 tsp sugar

Honey Chrysanthemum Sauce:
10 g baby chrysanthemum flowers
3 pieces licorice roots
380 ml water
3 tbsp honey

Cornstarch slurry:
2 tsp cornstarch + 2 tbsp water, mix until well combined

Methods:
1. In a saucepan, add water and bring to boil. Add baby chrysanthemum and licorice roots, turn to medium low heat and cook for 2 minutes. Cover the saucepan with lid and let the baby chrysanthemum to steep for 5 minutes. Strain the mixture and add in honey, mix well.
2. Mix the chicken with marinade and marinate for 2 hours. Coat the chicken with some cornstarch and deep fry in hot oil until crispy and golden brown. Dish out and drain well.
3. Bring the sauce to boil and add in cornstarch slurry, cook until the sauce is thicken. Turn off the heat and pour the sauce over the deep fried chicken. Serve hot.


This post is linked to the event Little Thumbs Up (Feb 2016 : Chrysanthemum and Edible Flowers) organised by Zoe from Bake for Happy Kids and Doreen from My Little Favourite DIY and hosted by Sharon from Sweet Home-Chefs.


Saturday, 27 February 2016

菊花鸡肉卷 Steamed Chicken Rolls with Chrysanthemum

平常家里最常用来煮食的食用花卉都是菊花和桂花,不过大多数都是用来煮凉茶或者是甜品,以花入馔来煮菜肴就未曾试过。这个月份的小拇指活动的主题是“菊花和食用的花卉”,我参考了一些食谱书,尝试以菊花入馔,准备两道以菊花为主的鸡肉菜肴来参与这个月的活动。第一道菊花菜肴是菊花鸡肉卷,构思是来自食谱书《大鸡腿》里的菊花蒸盐鸡腿食谱。由于家里只有去骨的鸡全腿,如果直接拿去蒸的话一定会影响口感,所以我就将鸡全腿卷起,用棉绳绑起来,做成鸡肉卷,蒸好后切成片状,不但外形好看,而且还很容易吃,因为鸡肉已经去骨了。食谱里的其中一个食材黄果子我没办法找到,过后就想起了之前准备过的胎菊甘草茶,觉得味道甘甜的甘草和菊花非常搭配,所以我就干脆以甘草来代替黄果子。


菊花鸡肉卷的外形虽然看起来和醉鸡卷一样,不过菊花鸡肉卷却不含酒精成份,所以非常适合小孩子食用。鸡肉卷以菊花水浸泡整夜,蒸出来后带点菊花的清香,吃起来肉也很鲜嫩,用来宴客一点也不失礼,有机会的话大家一定要试一试。


菊花鸡肉卷

材料:
鸡全腿 3个(去骨)
干菊花 50克
盐 1 1/2茶匙

菊花水:
干菊花 30克
甘草 2片
水 1000毫升

材料:
1. 在一个锅里,加入水煮滚。水滚后加入菊花和干草,转至中小火煮2分钟。加盖让菊花浸泡在水里,放置一旁,让菊花水完全冷却。

2. 用盐涂抹于鸡全腿,然后将鸡肉卷起,以棉绳绑起,收入冰箱腌制2小时。

3. 把鸡肉卷放入菊花水里,确定鸡肉卷完全浸泡在菊花水里,收入冰箱冷藏,让其浸泡过夜。

4. 在一个蒸盘里铺上一些干菊花,把鸡肉卷放在上面,再以更多干菊花盖着鸡肉卷。

5. 把鸡肉卷放入锅里蒸,以中火蒸大约20分钟或至熟。取出鸡肉卷,待稍微凉后就把鸡肉卷切成1公分片状,排入盘后就可趁热享用。


份量:4人份


Steamed Chicken Rolls with Chrysanthemum

Ingredients:
3 chicken whole legs, deboned
50 g dried chrysanthemum flowers, rinsed
1 1/2 tsp salt

Brine:
30 g dried chrysanthemum flowers, rinsed
2 pieces licorice roots
1000 ml water

Methods:
1. In a pot, add water and bring to boil. Add chrysanthemum and licorice roots, turn to medium low heat and cook for 2 minutes. Cover the pot with lid and let the chrysanthemum to steep in the water. Set aside and allow the brine to cool completely.

2. Rub the chicken with salt, then roll up the chicken and tie with cotton strings Marinade the chicken rolls for 2 hours in refrigerator.

3. Place the chicken into the brine solution, make sure the chicken rolls are fully submerged in the brine. Place the brine in the refrigerator and let it soak for overnight.

4. Line the steaming plate with some dried chrysanthemum flowers. Place the chicken rolls on top then cover the chicken rolls with more dried chrysanthemum flowers.

5. Steam the chicken rolls in a wok over medium heat for about 20 minutes or until the chicken rolls are cooked. When the chicken rolls are cooled enough to handle, slice the chicken rolls into 1cm slices and serve hot.


Servings: 4


This post is linked to the event Little Thumbs Up (Feb 2016 : Chrysanthemum and Edible Flowers) organised by Zoe from Bake for Happy Kids and Doreen from My Little Favourite DIY and hosted by Sharon from Sweet Home-Chefs.


Thursday, 31 December 2015

冬菇鸡脚面 Braised Mushroom & Chicken Feet Noodles

今年一月时准备了很多面食来参加一月份的小拇指活动,可是因为时间的关系,没能呈上所有的食谱,这冬菇鸡脚面便是其中一样。相信冬菇鸡脚是很多人的最爱,不过如果在外面吃鸡脚的话又有点尴尬,尤其是未斩件鸡脚,所以我喜欢自己在家里煮,可以吃的比较自在。
冬菇鸡脚蛮容易准备,我提早将冬菇鸡脚焖好,晚餐时烫些青菜和云吞面就可以吃了。


往年的最后一个帖子都是以甜品或饮料作结尾,不过今年就比较忙,没能抽空准备,只好从旧的作品中挑一个作为结尾的帖子。很快2015年就要结束了,多谢大家在这一年对爱心厨房的支持!很期盼明年的到来,希望可以抽出更多时间,分享更多的食谱给大家。在这里祝大家在新的一年里过得顺顺利利,开开心心。


Happy New Year! 
Wishing you all a new year filled with Peace, Joy, 
Health and Prosperity!


冬菇鸡脚面 

材料:
新鲜云吞面 6团(每团约86克)
香港菜心 12棵(洗净沥干)

捞面酱料:(1人份)
老抽 1茶匙
蚝油 1/2茶匙
酱油 1/2茶匙
麻油 1茶匙
胡椒粉 少许

冬菇鸡脚:
炸鸡脚 30个
香菇 12朵(浸泡至软)
清水 2公升
蒜头 1整颗
姜 4片

香料:
肉桂 2支
八角 2个
丁香 2个
小豆蔻 3个
花椒 1茶匙

调味料:
老抽/黑酱油 3汤匙
蚝油 4汤匙
麻油 1汤匙
冰糖 30克
盐 1/2茶匙,或更多

芡汁:
粟粉 4汤匙
清水 1/2杯

沾酱:
腌青辣椒
酱油

做法:
1. 冬菇鸡脚:
加入2汤匙的油在锅里,以中火烧热,加入香料炒至香。然后再加入鸡脚及冬菇,拌炒大约1分钟。之后加入蒜头,姜片,调味料和清水,以大火煮滚,然后再转至小火,加盖焖煮2小时或至鸡脚焖软为止。再次将冬菇鸡脚煮滚,倒入芡汁,搅拌均匀,将酱汁煮至浓稠即可。

2. 准备干捞面:
先煮滚一锅水,然后加入1汤匙的食油和一茶匙的糖,放入菜心川烫至熟。预备一个碗里,加入捞面酱料。把水再次煮滚,把云吞面弄散,投入滚水里,以筷子拨散,煮大约60秒。面煮好后用筛捞起,立即用自来水冲洗数秒,然后再浸入滚水中烫一烫,捞起沥干水份。把煮好的面倒入已加入酱料的碗里,捞至均匀。

3. 上桌
将捞好的面放入一个碟子里,勺入冬菇鸡脚,加入川烫过的菜心,趁热伴与沾酱一起食用。


份量:6人份


Braised Mushroom & Chicken Feet Noodles

Ingredients:
6 bundles of fresh wonton noodles (about 86g each)
12 stalks Hong Kong Choy Sum, washed and drained

Noodle sauce: (per serving)
1 tsp dark soy sauce
1/2 tsp oyster sauce
1/2 tsp soy sauce
1 tsp sesame oil
A dash of white pepper

Braised Mushroom & Chicken Feet:
30 deep fried chicken feet
12 dried mushrooms, rinsed and soaked until softened
2 litres water
1 bulb of garlic
4 slices of ginger

Spices:
2 cinnamon sticks
2 star anise
2 cloves
3 cardamon
1 tsp Sichuan peppercorn

Seasoning:
3 tbsp dark soy sauce
4 tbsp oyster sauce
1 tbsp sesame oil
30g rock sugar
1/2 tsp salt, or more to taste

For thickening:
4 tbsp cornstarch
1/2 cup water
(Combine and stir until no lumps remain)

Condiment:
Pickled green chilies
Soy sauce

Methods:
1. Braised Mushroom & Chicken Feet:
Heat 2 tbsp oil in a pot over medium heat. Add spices and saute till fragrant. Then add chicken feet and mushroom, stir fry for about 1 minute. Add garlic, ginger, seasoning and water. Bring to a boil then cover with lid and cook over low heat for about 2 hours or until the chicken feets are tender. Bring to boil again, then pour in the cornstarch slurry, stir well and cook until the sauce is thicken.

2. To prepare dry toss noodle:
Bring a large pot of water to the boil. Add 1 tbsp of vegetable oil and 1 tsp of sugar. Blanch the choy sum till cooked, drain and set aside. Prepare the noodle sauce in a bowl. Bring the pot of water to boil again, loosen 1 portion of noodle, then put the noodle into the boiling water, stir with a pair of chopstick, cook for about 60 seconds. When the noodle is cooked, drain the noodle using a sieve, and immediately rinse it with running tap water for few seconds. Then quickly dip the noodles in the boiling water again for few seconds and drain. Place the cooked noodles into the bowl with prepared sauce and toss well.

3. To serve:
Transfer the noodles to a serving plate. Top the noodle with blanched choy sum, braised chicken feet and mushroom. Serve hot with condiment.


Serving: 6


Thursday, 26 November 2015

烤鸡与草莓芒果鳄梨沙拉 Grilled Chicken Salad with Strawberry, Mango and Avocado

平时在家如果只准备两人晚餐时我多数都会准备沙拉,不但容易准备,而且也比较健康。最近迷上了烤鸡沙拉,连续三个星期,家里的二人晚餐必定会看到它的踪影。一般不爱吃蔬菜的人都会觉得吃沙拉是件非常痛苦的事,不过如果可以把不同的水果加入在沙拉里,鲜艳的颜色不但令人胃口大开,而且也让人比较容易接受。


之前准备卡疆鲜虾墨西哥塔可时买了罐卡疆调味料回来,味道非常好,我觉得用于烤鸡应该不错,  实验了几次,最后觉得要加些卡宴辣椒粉一起调味,让烤鸡吃起来带点微辣,会更美味。煮鸡胸肉是最重要是要控制煮的时间,煮过久的话会让鸡胸肉吃起来干干柴柴的。我将鸡胸肉每面烤三分钟,烤好后熄火让鸡胸肉继续留烤镬锅里休息,利用余温将鸡胸肉烤熟。我试了这方法好几次,每次烤出来的鸡胸肉都嫩嫩的很好吃。不过各家的火炉火力都不同,所以我的时间也只是供参考而已,如果要煮出嫩嫩的鸡胸肉就必须自行调整火力和时间了。


原本沙拉里是有加入胡桃的,我赶着拍照结果忘了放,
拍完照后才记起忘了放。


烤鸡与草莓芒果鳄梨沙拉

(食谱参考The Craving Chronicles,做少许更改)

材料:
沙拉:
绿与红珊瑚生菜 150克
草莓 6粒(去蒂切片)
鳄梨 1粒(去皮切丁)
芒果 1粒(去皮切丁)
胡桃 1/4杯(烤香)

卡疆烤鸡:
鸡胸 1副(重约500克,切半)
卡疆调味料 2汤匙
卡宴辣椒粉 1/4茶匙
盐 1/4茶匙,或适量

酸醋调味汁:
意大利香醋 2汤匙
纯橄榄油 2汤匙
柠檬汁 1汤匙
蜂蜜1/2汤匙
盐 1/4茶匙

1. 酸醋调味汁:
在一个小碗里混合所有材料,除了橄榄油。搅拌调味汁,然后缓缓地加入橄榄油直到乳化,然后放置一旁待用。

2. 卡疆烤鸡:
在一个小碗里混合卡疆调味料、卡宴辣椒粉和盐。将混合香料搽于鸡胸肉,然后腌制1小时。在烤镬里加入2汤匙橄榄油,以中高火烧热。放入鸡胸肉,两面各烤3分钟左右,然后熄火,让鸡胸肉在烤镬里休息10分钟。取出鸡胸肉,斜切块备用。

3. 上桌:
把生菜、草莓、芒果和鳄梨分成两份,然后放入盘中。加入胡桃和烤鸡,淋上酸醋调味汁,马上享用!


份量:2人份


Grilled Chicken Salad with Strawberry, Mango and Avocado

(Recipe adapted from The Craving Chronicles, with some adjustments)

Ingredients:
Salad:
150 g green and red coral lettuce
6 strawberries, hulled and sliced
1 avocado, peeled and diced
1 mango, peeled and diced
1/4 cup pecan, toasted

Grilled chicken:
1 chicken breast, cut into half (about 500g)
2 tbsp cajun seasoning
1/4 tsp cayenne pepper
1/4 tsp salt, or to taste

Vinaigrette:
2 tbsp balsamic vinegar
2 tbsp extra-virgin olive oil
1 tbsp lemon juice
1/2 tbsp honey
1/4 tsp salt

Method:
1. Vinaigrette:
In a small bowl, combine all ingredients except olive oil. Whisk the mixture then slowly pour in olive oil, whisk until the mixture is emulsified. Set aside until ready to use.

2. Grilled chicken:
In a small bowl add cajun seasoning, cayenne pepper and salt. Rub the chicken breast with  the mix seasoning and marinade for 1 hour. Heat 2 tbsp of olive oil in a grill pan over medium high heat, place the chicken breast in the grill pan and grill for about 3 minutes on each side. Turn off the heat and leave the chicken breast in the grill pan and rest for 10 minute before slicing.

3. To serve:
Divide lettuce, strawberry, mango and avocado into two portions and place in serving plates. Add pecan and sliced grilled chicken. Drizzle with vinaigrette and serve immediately.


Serving: 2


This post is linked to the event Little Thumbs Up (Nov 2015 : Mango) organised by Zoe of Bake for Happy Kids and Doreen of My Little Favourite DIY and hosted by Jozelyn Ng from Spice Up My Kitchen.


Related Posts Plugin for WordPress, Blogger...