Showing posts with label 饼干 Cookies. Show all posts

Saturday, 14 February 2015

熊猫饼干 Panda Cookies

早前带着小宝贝前往Publika看1600只熊猫的展览,不过由于当天是周末,人潮拥挤,很难慢慢拍照,也没有机会排队抱着熊猫一起拍照,随便拍了照片就买了些纪念品回家。这次的展览让小宝贝一次过看到这么多熊猫,让她对熊猫的印象非常深刻。我们买回家的熊猫玩偶在回程时我就替他取了个名字,叫乐乐,兴奋看到新玩偶的小宝贝马上就学叫乐乐,全程抱紧紧,不肯放手。


今年的年饼都含果仁或者是辣味的,不适合小宝贝食用,所以为了让小宝贝也有自己的年饼,我就特意做了这款熊猫饼干。可爱的熊猫造型小宝贝一看就喜欢了,一直吵着要吃,不过妈咪我就非常坚持,必须等到新年时才可以吃。妈咪我不想让小宝贝吃太甜和太多巧克力,所以糖和可可粉的份都已经减少了。贪心的我做了原食谱的一倍份量,结果我只用了一半的面团而已,由于烘焙的时候已经夜深,所以没办法继续再做下去,其他另一半就收入冰箱里冷冻起来。


这熊猫饼干模具是网购的,一组有四个熊猫饼干造型,里面附有食谱和做法,如果有兴趣的朋友可以从这里订购。这熊猫饼干我做了六组,印好了熊猫面团后我又手痒痒,翻出小熊和心型饼干模具,把其他的面团擀一擀,印了些心型饼干和小熊抱抱饼干,应一应节。


祝大家情人节快乐,愿天下有情人终成眷属。
♥ Happy Valentine’s Day! ♥


熊猫饼干

材料:
面粉 320克
面粉 280克 + 可可粉 40克
鸡蛋 2粒
牛油 240克
糖 200克

做法:
1. 将牛油与糖打至变浅黄松发,分三次加入糖。然后再把鸡蛋逐粒加入,打至均匀。
2. 把牛油混合物分成两份。一份加入320克的面粉,另一份则加入280克的面粉和40克的可可粉,分别用刮刀拌匀,然后用手搓成球状,用保鲜膜包好。
3. 将面团放入冰箱冷藏约30分钟至1小时。
4. 取出面团,擀平,然后用熊猫饼干模具印出熊猫面团来,将面团放在铺好烘焙纸的烤盘上。一直重复直到印完所有面团为止。
5. 放入预热的烤箱里,以160℃烤15分钟。


Panda Cookies

(Recipe adapted from Bento, Monsters, with some adjustments)

Ingredients:
320 g flour
280 g flour + 40 g cocoa powder
2 egg
240 g butter
200 g sugar

Method:
1. Beat butter with sugar, adding the sugar in 3 portions. Whisk till creamy. Add in egg and whisk .
2. Divide the butter mixture into half. Add 320g flour to one portion. Add 280g flour and 40g cocoa powder to the other portion. Mix well with spatula and shape into a ball with your hands. Cling wrap the plain dough and brown dough separately.
3. Put in fridge for around 30 minutes to an hour.
4. Take out dough, roll out, cut with Panda cookie cutter and place on baking paper.
5. Bake in preheated oven at 160°C for 15 minutes.


This post is also linked to Best Recipes for Every one Jan & Feb Event: My Homemade Cookies
Hosted by Fion of XuanHom’s Mom & Co-Hosted by Victoria Bakes.


and linked to Cook and Celebrate: CNY 2015 organised by Yen from Eat your heart out, Diana from Domestic Goddess Wannabe and Zoe from Bake for Happy Kids.


and also linked to the event Little Thumbs Up (Feb 2015 Event: Cocoa) organised by Zoe of Bake for Happy Kids and Doreen of My Little Favourite DIY and hosted by Grace of Life can be Simple.


情人节快乐! ♥ Happy Valentine’s Day!

祝大家情人节快乐,愿天下有情人终成眷属。

♥ Happy Valentine’s Day! ♥


Thursday, 12 February 2015

夏果俄罗斯茶饼 Macadamia Russian Tea Cakes

Kenneth那里有不少的饼干食谱,样样都很吸引我,不过由于时间有限,只能选几款来做而已。这款夏果俄罗斯茶饼不止名字特别,连外形都很吸引我,茶饼里面就加入了夏威夷果,而外面就裹上一层的糖份,吃起来脆脆又甜甜的。


久没烤饼干了显得有点生疏,尤其是需要处理较软的面团,不过放入冰箱冷藏过面团就比较好处理。烤好的第一盘茶饼外形有点不一样,感觉塌了下来,像半圆球状,这和在Kenneth那里看到的有点不同,所以我就赶紧问一问Kenneth,过后发觉可能是较油的关系,所以我在剩下的面团里加入少许的面粉,第二盘烤出来的茶饼外形就好很多了。虽然这食谱里是用了夏威夷果,不过可以随各人的喜好换成其他坚果,我做了两份食谱,一份放了夏威夷果,而另一份放了杏仁碎,两款坚果吃起来都不错。


夏果俄罗斯茶饼

(食谱参考 Guai Shu Shu)

材料:
牛油 225克
普通面粉 250克
切碎夏威夷果 100克
糖粉 50克
糖粉 适量
香草精 1茶
一小撮盐

做法:
1. 将烤箱预热至170°C。

2. 将牛油与50克的糖粉打至变浅黄松发,筛入面粉,用刮刀拌至均匀。加入切碎夏威夷果,香草香精和盐,搅拌至均匀即可。

3. 将面团放入冰箱冷藏大约10至15分钟直到有些硬化。

4. 以1/2汤匙勺出面团,放在掌心搓圆成球状,然后放在烤盘里。将烤盘放入冰箱里烤10至12分钟。

5. 茶饼一烤好后就立即放入装着糖粉的碗里,将茶饼滚上糖粉,然后取出放在烤网上待凉。当茶饼完全冷却后再次将茶饼放入碗里滚上糖粉。将茶饼储存在密封的容器中。


份量:70粒


Macadamia Russian Tea Cakes 

(Recipe adapted from Guai Shu Shu, with some adjustments)

Ingredients:
225 g butter
250 g plain flour
100 g chopped macadamia nuts
50 g icing sugar
More icing sugar for rolling
1 tsp vanilla essence
A pinch of salt

Methods:
1. Preheat the oven to 170°C.

2. Cream the butter and 50 grams of icing sugar until light and pale. Sift in plain flour, use a spatula to stir until well mixed. Add chopped macadamia nuts,  vanilla essences and salt, stir again until well mixed.

3. Chill in the fridge until slightly harden which took about 10-15 minutes.

4. Scoop 1/2 tablespoon of dough and shape it into a ball using your palm, then place on prepared baking tray. Bake it in the oven for 10-12 minutes.

6. Immediately when the cookies are out of oven, get ready a bowl of icing sugar, transfer the cookies to the bowl and roll against the sugar powder. Take out and put in a wire rack and cool completely. Once the balls are completely cooled, roll against the icing sugar again. Keep the cooled cookies in an air tight container.


Yields: About 70 balls


I am submitting this post to Best Recipes for Every one Jan & Feb Event: My Homemade Cookies Hosted by Fion of XuanHom’s Mom & Co-Hosted by Victoria Bakes.


I am also submitting this post to My Treasured Recipes#5 - Chinese New Year Goodies (Jan/Feb 2015) Hosted by Miss B of Everybody Eats Well in Flanders & Co-Hosted by Charmaine of Mimi Bakery.


This post is also linked to Cook and Celebrate: CNY 2015 organised by Yen from Eat your heart out, Diana from Domestic Goddess Wannabe and Zoe from Bake for Happy Kids.


Sunday, 8 February 2015

虾米辣椒饼干 Spicy Dried Shrimp Sambal Cookies | Hae Bee Hiam Cookies

平时吃的饼干都是甜味的,偶然从Kenneth那里看到一款很特别的咸味饼干,虾米辣椒饼干。虾米辣椒是我的最爱,向来都有自己准备的习惯,虽然准备功夫多而且炒的时间也长,不过我还是喜欢自己炒,因为可以随意调整辣度和咸度。为了这次的饼干炒了一大锅的虾米辣椒,一半份量拿来做饼干,另一些就拿来炒米粉和肠粉。


这虾米辣椒饼干吃起来香香辣辣的,很特别,让人吃了一块接一块,停不了口。如果吃腻了平时那些甜甜的饼干,或许你可以尝试做这款香辣的咸味饼干,为家人和拜访的客人们带来一点惊喜。


由于我的虾米辣椒不是太辣,所以饼干吃起来也不会太辣,
所以有一批饼干我额外加入干辣椒碎以增添辣味。


刚烤好的饼干吃起来脆脆的,放凉后就变得酥酥的,
两者比较起来我较爱吃脆脆的口感。


虾米辣椒饼干

(食谱参考Guai Shu Shu,做少许更改)

材料:
牛油 250克(放在室温至软化)
面粉 2杯
玉米粉 1/2杯
鸡蛋 2粒
虾米辣椒 1杯(市售或自制,食谱请参考这里和这里)
鸡精块 1汤匙
白胡椒粉 1茶匙
酱油 1/2汤匙
蛋黄 2个(搽面)
保鲜膜 适量

做法:
1.在烤盘上铺上烘焙纸,将烤箱预热至180℃。

2. 将牛油打至变浅黄松发,然后再把鸡蛋逐粒加入,打至均匀。筛入玉米粉、面粉和白胡椒粉,用搅拌机以低速搅拌至均匀。

3. 加入酱油,鸡精块和虾米辣椒,用搅拌器搅拌至均匀。将面团分成数份,比方说每个面团200克,然后以保鲜膜包成四方形长条,扭紧两端。

4. 将面团放入冰箱让其冷冻至变硬,大约需要15分钟的时间。当面团变硬后将其取出,用刀切片状。将蛋黄与2汤匙牛奶混合,然后搽于饼干表面。

5. 放入预热的烤箱烤12-15分钟,或至饼干开始变成金黄色。烤好后让饼干完全冷却,然后将饼干储存在密封的容器中。


份量:78片


Spicy Dried Shrimp Sambal Cookies | Hae Bee Hiam Cookies

(Recipe adapted from Guai Shu Shu, with some minor adjustments)

Ingredients:
250 g butter (soften at room temperature)
2 cups plain flour
1/2 cup corn starch
2 eggs
1 cup dried shrimp sambal (store bought or homemade, kindly refer here and here for recipe)
1 tbsp chicken stock cube
1 tsp white pepper
1/2 tbsp soy sauce
2 egg yolks for egg washing
Some cling wrap

Methods:
1. Line the baking trays with parchment/baking paper and preheat the oven to 180°C.

2. Cream the butter until light and pale. Add in one egg at a time, beat until well mixed. Sift in the corn starch, plain flour and white pepper. Use the mixer to mix at slow speed until well combined.

3. Add soy sauce, chicken stock cube and dried shrimp sambal. Use the mixer to mix again until well combined. Transfer out and divide the dough equally,  about 100 gram per dough. Put one portion of the dough on the clingy wrap and roll it into a rectangular shape. Tighten both ends.

4. Put the dough in the freezer and let it harden. It will require about 15 minutes. When hardened, use a knife to cut into smaller pieces. Egg wash the cookie if preferred. For egg washing, crack 2 eggs and mix the egg yolks with 2 tablespoons of milk.

5. Bake in the preheated oven for 12-15 minutes or when it started to turn golden brown. When done, let the cookies cool completely and store them in air-tight container.


Yields: 78 pieces


I am submitting this post to Best Recipes for Every one Jan & Feb Event: My Homemade Cookies Hosted by Fion of XuanHom’s Mom & Co-Hosted by Victoria Bakes.


I am also submitting this post to My Treasured Recipes#5 - Chinese New Year Goodies (Jan/Feb 2015) Hosted by Miss B of Everybody Eats Well in Flanders & Co-Hosted by Charmaine of Mimi Bakery.


This post is also linked to Cook and Celebrate: CNY 2015 organised by Yen from Eat your heart out, Diana from Domestic Goddess Wannabe and Zoe from Bake for Happy Kids.


Monday, 27 January 2014

黄梨卷 Pineapple Nastar Rolls

“春风它吻上了我的脸, 告诉我现在是春天,谁说春眠不觉晓,只有那懒人儿才高眠 。。。”,每当农历新年前,家里在大扫除或做饼时我们家都会开始播那经典的贺岁名曲,这些贺岁名曲都是属于40至50年代的,家里可说是人人都爱听,那张CD是好多年前买的,现在已经很难找到类似的怀旧贺岁名曲了。结婚后夫家这边没有播新年歌的习惯,所以我总觉得少了一些新年气氛。城中的The Gardens购物广场今年的新年装饰是怀旧风格,刚巧广场内又播着这些熟悉的怀旧贺岁名曲,我就在想市场上一定有卖着这些名曲的CD,找了两家店, 终于让我给找着了,里面的歌曲几乎和娘家的那个CD一样,实在是太高兴了。


我又再做黄梨饼了,这次用了妈妈的那个食谱。之前做的花型黄梨挞虽然饼皮入口即化,可是家人吃惯带脆口感的饼皮,还是会想要吃回那个版本的黄梨饼。其实一开始时是想用妈妈的食谱,不过每次看到她挤饼皮时都很吃力,现在要自己一个人做饼,我怕我应付不来,所以想要用其他食谱来做黄梨饼。刚认识老公时,他是喜欢那种入口即化的黄梨饼,可是开始吃我家的黄梨饼后,开始被我们影响了,那个花型黄梨挞我以为他会很喜欢,试吃了后他觉得不错,可是还是喜欢我妈妈的那个版本。我不是在夸自家的食谱好,只是有时习惯了某个口感和味道,就很难要再接受其他的改变,就像那个怀旧贺岁曲一样,不习惯的人会觉得很老土很吵,习惯了,喜欢了,就会当它是宝,听多少次也不会觉得厌,所以最后我还是选择用妈妈的食谱来做这个黄梨卷。


这次黄梨卷的照片依旧是以花为主题,新年一定要有梅花或桃花的衬托才能让人感觉到浓浓的新年气息。


这次的黄梨卷我用了两个不同的花嘴,各有各的美,哪一款较合你的心意呢?


我们家的黄梨卷的饼皮比较不一样,其他的食谱都是加入蛋黄或全蛋,而我们家的是加入蛋白,刚烤好的饼皮是带脆的,待过几天回油后才会有酥酥的口感。


我的蛋黄液涂得满均匀吧?每粒黄梨卷都是金黄色的。这是靠多年的涂蛋黄液经验所修来的,哈哈,开玩笑的啦~!每年做黄梨饼时,家人都会分工合作,大家负责不同的工序,除了炒黄梨,准备饼皮和挤饼皮,其他的工序我都有参与过,虽然眼看是一些琐碎的工序,不过当自己要独当一面做饼时,这些学会了的技巧都会派上用场的。


那红和绿的红包袋是The Gardens今年的红包袋,
原本以为家人购物时会拿到精致的桂花茶罐,
结果看错了换取礼品的购物消费价额,
结果还差RM20才可换到茶罐,
茶罐换不成,最后只有拿到红包袋。


宝盒里装了“旺来”和金元宝,希望为大家带来好运和财运~!


这个宝盒是去年新年购物时换取的礼品,摆在盒子里原封不动已经将近一年,今年就拿出来让宝盒亮亮相!


刚刚买到的怀旧贺岁名曲,够经典吧~!


之前在那篇自制黄梨酱的帖子里我有提到妈妈的黄梨一向来
都是用刨刀来刨,这样煮出来的黄梨酱才有一丝丝的纤维。
妈妈今年炒了20粒黄梨,那天回家送礼时妈妈送了包
她自己炒的黄梨酱给我。所以这次的黄梨卷里的黄梨馅是
混合了我的自制黄梨酱和妈妈的黄梨酱。
图中的那个黄梨馅咬起来会有一丝丝的纤维,
这才是妈妈的招牌黄梨卷。


金黄色的黄梨球。。。


刚包好的黄梨卷。。。


这是姐姐借我的黄梨卷花嘴,阔度蛮长的,所以我做出来的黄梨卷比较大粒,上面图中的圆盒只可以装22至24粒的黄梨卷。


黄梨卷 Pineapple Nastar Rolls

材料:
饼皮:
无盐牛油 681克 (温室回软,我用两块Anchor和一块SCS)
面粉 1公斤
幼糖 120克
卡士达粉 2汤匙 [Custard Powder]
奶粉 3汤匙
云尼拉香精 1/2汤匙
蛋白 3粒
盐 1/2茶匙

馅料:
黃梨酱 约1.5公斤

搽料:
蛋黄 7粒(打散)

可做大约137粒

做法:
1. 先将黄梨酱搓成椭圆形备用,每份大约1/2汤匙(平匙)的份量,重约11克左右。把所有的粉类过筛备用。


2. 将牛油和糖粉打发,然后加入蛋白和云尼拉香精搅拌均匀。


3. 加入筛过的粉类和盐,用慢速度搅拌至均匀。


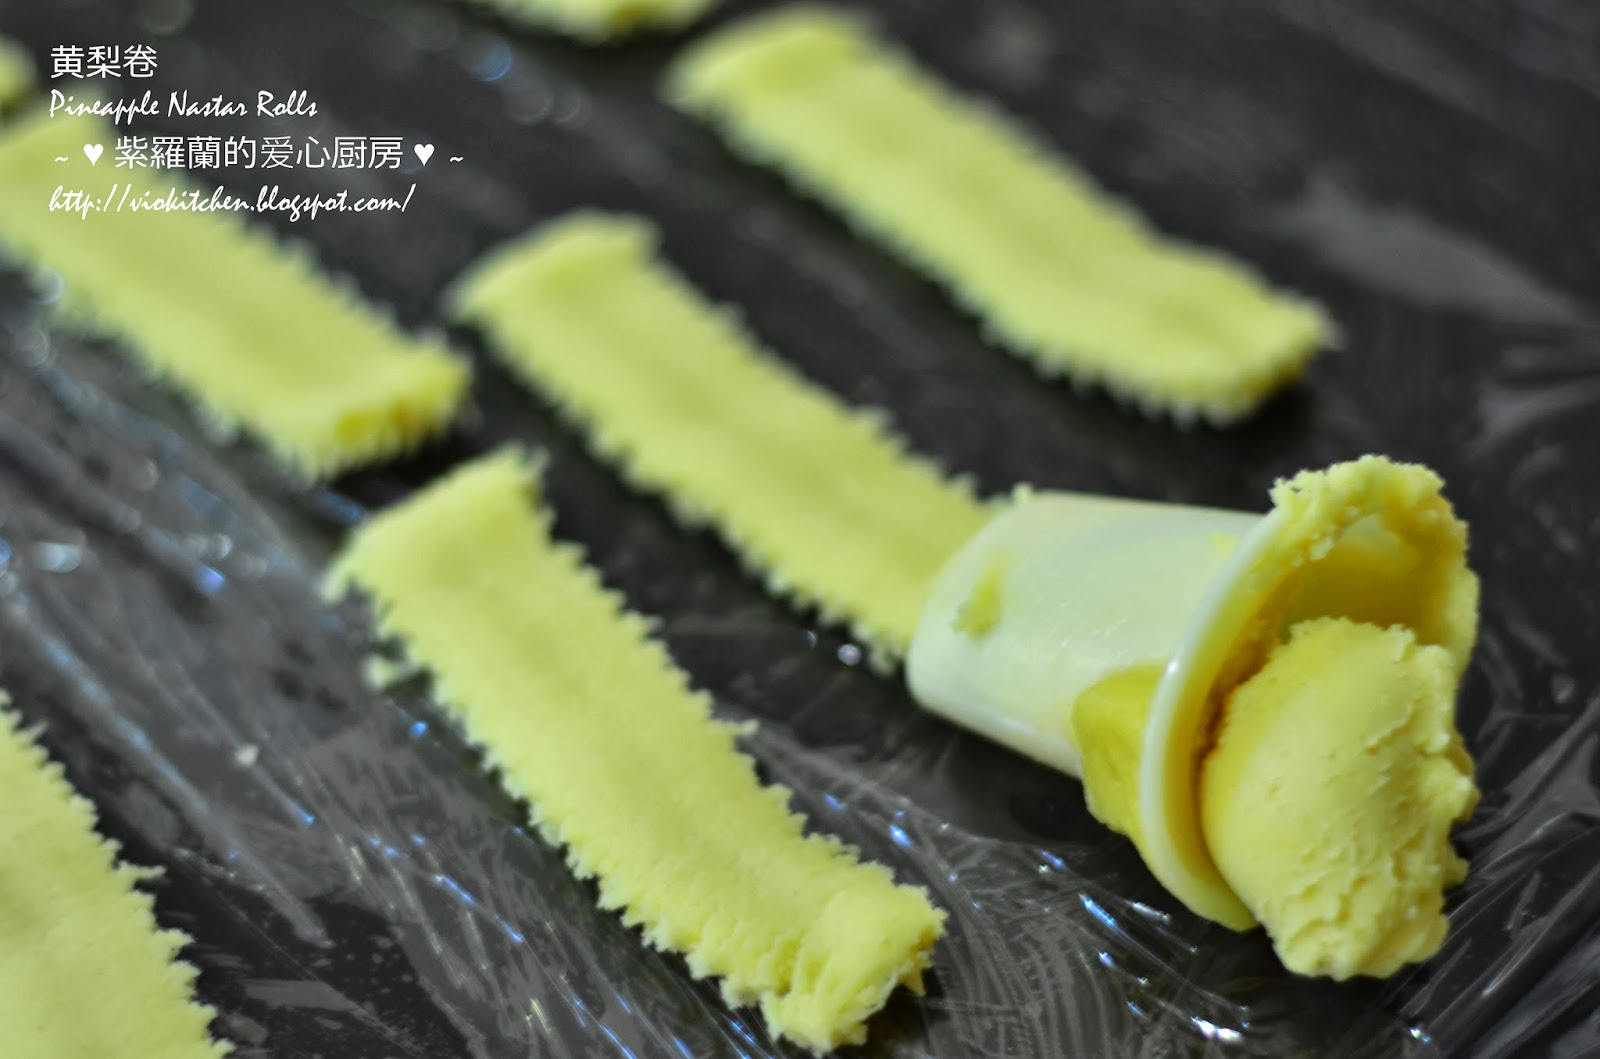
4. 将少许的饼干面团放入黄梨卷花嘴里,然后花纹面朝下,将面团挤出形成长条状,在面团的前端放上一粒黄梨馅,轻轻地卷起把黄梨馅包入,切掉多余的面团,将卷好的黄梨卷铺排在放了烘焙纸的烤盘里,黄梨卷面团重叠的部份朝下,这样看起来比较美,排放每个黄梨卷时须留点距离。


5. 重复步骤4直到完成为止,卷好所有的黄梨后即可在黄梨卷的表面涂上一层蛋黄液。


6. 将烤盘放入预热170°C的烤箱里,烘烤大约20分钟或至熟即可。将烤盘取出,待凉后才可以收纳进罐里。


I am linking this post to Bake-Along #57 : Theme - Chinese New Year Cookies organised by Frozen Wing, Bake for Happy Kids and Kitchen Flavours.


Related Posts Plugin for WordPress, Blogger...