Friday, 31 July 2015

樱花茶 Cherry Blossom Tea | 桜茶 Sakura-cha

Sakurayu(桜湯)或Sakura-cha(桜茶),是日本的樱花茶,以盐渍樱花加入热水浸泡成的。盐渍樱花在水中美丽地绽放,一面欣赏那美丽又迷人的粉红色樱花,一面品尝樱花茶的味道,感觉就在樱花盛开的季节里。


在江户时代,日本人在婚礼或者是相亲的席上就有喝樱花茶的习惯。日本有句俗语:“把茶水搞浑浊”,意思是仅此一次,蒙混过关之意。相亲与结婚都是人生大事,必须态度鲜明,不能不明不白,糊里糊涂,更不能对付。于是,人们在这种重要的场合就用漂亮清澈的樱花茶代替普通茶水。樱花茶是用腌制的樱花泡制。经过传统工艺腌制的樱花必须带有一点点枝干,花朵饱满。当将其放在茶水中冲泡时,因为腌制而萎缩的樱花就会盛开,既美观又典雅,让喜事锦上添花,因此喝樱花茶的习俗流传至今。(资料来源这里


看完了樱花茶的典故后我有一件事想在这里跟大家分享一下。早前家里的一位长辈因癌症病逝了,过不久又得知另一位长辈也得了癌症,听到这些消息后真的让我很惊讶,也很难过。 两位长辈的遭遇让我醒悟了,知道不应该再忽略自己的健康。其实还没怀上小宝贝前我就发觉自己乳房好像有些肿块,不过那时妇科医生检查后说要继续观察看有没有其他变化。从那时到现在大约两年多了,期间我也没有再去做检查,一直忽视它的存在,直到最近我才下定决心认真地去做检查。约了医生做了个详细检查,检查结果发现有两个肿块的形状很可疑,有一半机会是良性,一半机会会是恶性。询问了医生的意见后决定安排日子进院做活检,等了两个星期后终于有了结果,还好结果是良性的,不会影响到健康。得知消息后,我才放下心中的大石头,不过往后的日子要更加注意我的健康了,要早睡早起及有良好的饮食习惯,所以我也会减少上贴子,留更多时间来放松自己和做些运动。


这个月的小拇指活动《茶语飘香》终于来到尾声了,这个月里各位博客都忙着烘烤各式各样以茶为主的蛋糕和饼干,而我呢则一直忙着准备不同的茶饮料和甜品,当中也有一些以茶入馔的菜肴。其实我也想做绿茶蛋糕或伯爵茶蛋糕之类的甜品,不过家里的小宝贝还小,暂时都不可以吃这类食品,所以只好作罢。接下来的日子我也不能再像以往一样那么活跃地参加这类型的活动了,虽然是有点可惜,不过为了健康着想,也必须让自己退下来,不能再让自己那么忙了。


献上美丽的樱花茶给大家作为《茶语飘香》的终结,希望大家会喜欢!此外我也想借此机会呼吁大家一定要定时做身体检查,有了健康的身才能为家人带来幸福!祝大家身体安康!


下午茶时间 ~ 半熟芝士蛋糕 + 樱花茶


樱花茶

(食谱参考Nihon Ichiban,做少许更改)

材料:
热水 适量
盐渍樱花 1朵

做法:
1. 把盐渍樱花浸泡在温水中1-2分钟,沥干将水弃之。
2. 将盐渍樱花放入杯中, 倒入热水,让花浸泡在热水里1-2分钟。 趁热饮用。


Cherry Blossom Tea

(Recipe adapted from  Nihon Ichiban, with some adjustments)

Ingredients:
Some hot water
1 pickled cherry blossom / sakura

Method:
1. Soak the cherry blossoms in warm water for 1-2 minutes. Drain and discard the water.
2. Place the cherry blossoms in a cup or glass, then pour the hot water over and allow the flowers to steep in hot water for 1-2 minutes. Serve hot.


This post is linked to the event Little Thumbs Up (July 2015 Event: Tea) organised by Zoe of Bake for Happy Kids and Doreen of My Little Favourite DIY and hosted by Cheryl of Baking Taitai.


抹茶意式奶冻 Matcha Panna Cotta

前晚一口气做了两款抹茶口味的甜品,一款是用蒟蒻果冻粉做成的抹茶果冻,另一款是用鱼胶粉做成的抹茶意式奶冻。一个果冻,一个奶冻,虽然是一样的口味,不过口感却迥然不同,前者带Q,而后者则入口即化。今天就先分享抹茶意式奶冻的做法,而抹茶果冻的做法就留待下一次才分享。


抹茶意式奶冻做好后会分成三层,看了会让人以为做法很复杂。其实一点也不复杂,只需将煮好的奶冻放在室温,让颜色沉淀后才收入冰箱让其凝固,这样就可做成三层颜色的效果。抹茶意式奶冻的口感入口即化,而且奶香和抹茶味非常浓郁,再加上少许蜜红豆点缀,不仅可以增加色彩而且也让口感更丰富。只可惜这款甜品在家里不是很受欢迎,只有我自己喜欢,昨天拿给老公试吃可是他却不是很欣赏这款奶味浓郁的甜品,所以剩下的奶冻只好自己吃完。


除了模型,我也将奶冻液倒入玻璃杯中。
如果用玻璃杯的话就不需要倒模,
加入蜜红豆后就可以直接享用。


抹茶意式奶冻

材料:
牛奶 200毫升
鲜奶油  250毫升
无味鱼胶粉 2 1/2茶匙
水 50毫升
糖 80克
抹茶粉 3茶匙

做法:
1. 在一个小碗里加入水,然后撒上鱼胶粉,放置一旁大约5分钟。在另一个碗里加入100毫升的牛奶和抹茶粉,搅拌至均匀。
2. 在一个小锅里加入牛奶、鲜奶油和糖,搅拌至均匀。将混合物煮至微滚,然后加入鱼胶液和抹茶牛奶液,搅拌至完全溶化即可。
3. 把奶冻混合液过滤,然后倒入模型中,放置一旁直到降至室温。收入冰箱冷藏至少4小时或直到凝固。
4. 将模型浸泡在热水里大约5秒,把模型倒扣于一个碟子里,轻轻摇晃一下模型以让奶冻脱模。取开模型,以蜜红豆装饰即可享用!


Matcha Panna Cotta

Ingredients:
200 ml milk
250 ml whipping cream
2 1/2 tsp unflavoured gelatin
50 ml water
80 g sugar
3 tsp matcha powder

Method:
1. In a small bowl sprinkle the gelatin over the water and let stand for 5 minutes. In another small bowl, add 100ml milk and matcha powder, stir until well combined.
2. In a saucepan, add milk, whipping cream and sugar, stir until well combine. Bring the mixture to a slight boil. Add in the gelatin mixture and matcha milk mixture, stir until completely dissolved.
3. Strain the mixture through a fine mesh sieve. Then pour the mixture into moulds. Set aside and let it cool down to room temperature. Chill in refrigerator for at least 4 hours until set.
4. To serve, dip the mould into a bowl filled with hot water for about 5 seconds. Then turn the mould onto a serving plate, shake to release. Remove the mould, garnish with some cooked red beans and serve!


This post is linked to the event Little Thumbs Up (July 2015 Event: Tea) organised by Zoe of Bake for Happy Kids and Doreen of My Little Favourite DIY and hosted by Cheryl of Baking Taitai.


Thursday, 30 July 2015

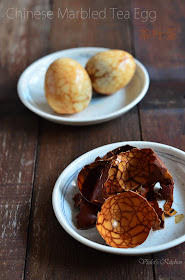
茶叶蛋 Chinese Marbled Tea Egg

其实我很喜欢吃茶叶蛋,每次在商场逛经过茶店或药材店时都会被摆在店外的那锅茶叶蛋的味道给吸引住, 不过却很少会停下来买,因为怕麻烦,而且带着小孩要边走边吃也不容易。偶然看到一个不错的茶叶蛋食谱,发觉要在家自己准备茶叶蛋一点也不难,只需一些茶叶和香料就行了。


我特地选用了普洱茶来煮这茶叶蛋,因为普洱茶的颜色较深,想必然出来的花纹颜色也会比较漂亮。虽然茶叶蛋是一种小吃,不过家人没什么吃小吃的习惯,而且放工回来大家都直接吃晚餐了,所以我就把茶叶蛋列入昨晚的晚餐菜肴之一。对于这次的茶叶蛋我还蛮满意的,因为每一颗茶叶蛋的花纹都很漂亮,而且也很入味,我想下一次煮茶叶蛋时我也会用回一样的食谱。


虽然只浸泡大约三小时,不过花纹也挺明显的。


(左上)甘草、普洱茶、陈皮
(左下)草果、桂皮、八角


茶叶蛋

(食谱参考Steamy Kitchen,做少许更改)

材料:
鸡蛋 8粒
酱油 1/2杯
老抽 2汤匙
冰糖 1汤匙
桂皮 2寸
八角 2个
草果 1个
甘草 5克
陈皮 5克
普洱茶 30克

做法:
1. 将鸡蛋轻轻放入一个中型锅里,注入适量的水,直到可以盖过鸡蛋大约1寸的高度。把水煮滚,然后转至中火煮3分钟。把蛋取出,放在流动的水下让蛋冷却。

2. 用茶匙背轻轻敲于蛋壳,敲得越多越仔细,花纹就会也多,必须小心敲以确保蛋壳不会脱落下来。

3. 在另一个锅里加入1.5公升的水,加入鸡蛋及其他材料。煮至滚,然后转至小火煮2小时。煮好后加盖让蛋浸泡数小时或放入冰箱里至隔夜。浸泡的时间越长,茶叶蛋也就会更入味,而且花纹的颜色也会更明显。


Chinese Marbled Tea Egg

(Recipe adapted from Steamy Kitchen, with some adjustments)

Ingredients:
8 eggs
1/2 cup soy sauce
2 tbsp dark soy sauce
1 tbsp rock sugar
1 2-inches cinnamon stick
2 star anise
1 Cao Guo
5 g Licorice root
5 g mandarin orange peel30 g Pu-er tea leaves

Methods:
1. Gently place the eggs in a medium pot and fill with water to cover the eggs by 1-inch. Bring the pot to a boil, lower the heat and let simmer for 3 minutes. Remove the eggs and let cool under running cool water.

2. Using the back of the teaspoon, gently tap the eggshell to crack the shell all over. The more you tap, the more intricate the design. Do this with a delicate hand to keep the shell intact.

3. In another pot add 1.5 litre of water, add eggs and the remaining ingredients. Bring the mixture to a boil and immediately turn the heat to low. Simmer for 2 hours, cover with lid and let eggs steep for a few hours to overnight in the fridge. The longer you steep, the more flavorful and deeply marbled the tea eggs will be.


This post is linked to the event Little Thumbs Up (July 2015 Event: Tea) organised by Zoe of Bake for Happy Kids and Doreen of My Little Favourite DIY and hosted by Cheryl of Baking Taitai.


Wednesday, 29 July 2015

南瓜香料茶拿铁 Pumpkin Spice Tea Latte | 多才艺博客奖 The Versatile Blogger Award

我很喜欢南瓜香料拿铁的味道,不过却不能喝太多的咖啡,为了解嘴馋我就把咖啡换成茶,然后用一样的食谱来准备拿铁。第一次的作品还没拍几张就乌云密布,天色也暗了起来,所以就草草了事。隔天又再次准备多一杯来喝,心想不如再拍多一次,马上就换了个不同的杯子,然后就开工咔嚓咔嚓。第二次的南瓜香料茶拿铁我加了一些现磨的黑胡椒,所以喝起来有点辣,天气凉凉的,喝起来也蛮舒服和暖胃。


Daiso买的奶泡器,之前准备抹茶拿铁时忘了拍,
现在补回,让大家可以看看奶泡器的样子。


南瓜香料茶拿铁

材料:
南瓜泥 2汤匙
南瓜派香料 1/4茶匙
有机原蔗糖 1 1/2汤匙
全脂牛奶 3/4杯
滚水 1/4杯
锡兰茶包 1个

做法:
1. 把1/4 杯滚水倒入一个杯里,将茶叶包放入浸泡5分钟。5分钟后将茶叶包取出。
2. 以中小火加热一个小锅里, 加入南瓜泥和南瓜派香料,炒大约2分钟,直到炒出香味。要不断搅拌。 加入糖,煮至呈浓糖浆状即可。
3.  加入牛奶,搅拌至均匀,煮至微滚即可熄火。以奶泡器将牛奶搅拌大约1分钟直到形成奶泡。
4. 把锡兰茶加入玻璃杯中,然后将热奶和奶泡倒入,乘热享用!


Pumpkin Spice Tea Latte

Ingredients:
2 tbsp pumpkin purée
1/4 tsp pumpkin pie spice
1 1/2 tbsp organic raw cane sugar
3/4 cup full cream milk
1/4 cup boiling water
1 Ceylon tea bag

Method:
1. Add 1/4 cup of boiling water to a cup. Place the tea bags in the cup and steep for 5 minutes. Remove tea bags and discard.
2.  Heat a small saucepan over medium low heat, add pumpkin purée and pumpkin pie spice. Cook for about 2 minutes till the pumpkin purée is hot and fragrant. Stir constantly. Add sugar and cook till the mixture become thick syrup.
3. Add milk to the saucepan. Stir till well combine and cook till slight boil. Turn off the heat. Using milk frother, froth the milk for about 1 minute until foamy.
4. Pour the Ceylon tea in a glass, then slowly pour the hot milk and foam into the glass. Serve hot.


I'm submitting this post to the Best Recipes for Everyone July 2015 Event (BREE# 11 I Have A Date with Pumpkin) organized by Fion of XuanHom's Mom and co-hosted by Rachel of Simple Life.


This post is also linked to the event Little Thumbs Up (July 2015 Event: Tea) organised by Zoe of Bake for Happy Kids and Doreen of My Little Favourite DIY and hosted by Cheryl of Baking Taitai.


*********************************************************************************


感谢May的提名多才艺博客奖,我在此领奖了。这是我的第一个在网络得的奖,默默耕耘多年的部落隔终于得到了认同,心里真的很高兴。辛苦了May半夜三更特地留言向我报喜,谢谢她带来的这个好消息让我高兴了整夜。May无论是在厨艺或者是拍照技术上都很了得,我也常被她家的各式各样菜肴、糕点、蛋糕和甜品吸引得流连忘返,所以有机会的话大家一定要到May家看一看。我也想借此机会向读者们道谢,因为有你们的支持,我的路才能走得这么远,我想跟大家一起分享这个奖,一起分享我此刻的喜悦!谢谢大家!


Tuesday, 28 July 2015

南瓜炒虾米 Stir Fried Pumpkin with Dried Shrimp

南瓜炒虾米是一道很普遍的家常小菜,也是妈妈常会煮的菜肴之一。印象中妈妈的南瓜炒虾米是有加入咖哩叶的,这种煮法让南瓜吃起来别有一番风味。甜美的南瓜加上虾米的鲜味,绝对是下饭的好菜肴。


南瓜炒虾米

材料:
南瓜 500克(去皮去籽,切成小块状)
虾米 1/4杯(洗净及浸泡5分钟)
蒜头 4瓣(剁碎)
咖哩叶 4支(只取叶子)
水 1至1 1/2 杯
食油 1汤匙
糖 1茶匙
盐及白胡椒粉 适量

做法:
1. 把油加入锅以中火烧热,加入蒜头爆香。接着加入虾米及咖哩叶,炒至香。
2. 加入南瓜,继续炒多一分钟。
3. 倒入水,确定水份足够盖过南瓜,煮至滚后加盖焖煮南瓜至变软及水份减少。加入适量的盐及白胡椒粉调味,盛碟即可乘热享用。


Stir Fried Pumpkin with Dried Shrimp

Ingredients:
500 g pumpkin, peeled, remove seeds and cubed
1/4 cup dried shrimp, rinsed and soaked for 5 minutes
4 cloves of garlic, minced
4 sprigs curry leaves, use only the leaves
1 to 1 1/2 cups water
1 tbsp cooking oil
1 tsp sugar
Salt and white pepper to taste

Method:
1. Heat wok with oil over medium heat. Add garlic and saute till fragrant. Add dried shrimp and curry leaves, stir fry till fragrant.

2. Add pumpkin cubes and stir fry for another minute.

3. Pour in the water and ensure the water is just enough to cover the pumpkin. Bring to boil and then cover the wok with lid, cook until the pumpkin is tender and the water is reduced. Add salt and white pepper to taste. Transfer to serving plate and serve hot.


I'm submitting this post to the Best Recipes for Everyone July 2015 Event (BREE# 11 I Have A Date with Pumpkin) organized by Fion of XuanHom's Mom and co-hosted by Rachel of Simple Life.


Sunday, 26 July 2015

茶熏蛋 Tea Smoked Egg

我家的茶熏蛋终于可以亮相了,第一次太过生,第二次不小心让蛋黄液流掉一大半,第三次终于成功了!试煮这么多次溏心蛋,最满意就是这次了!用来做燻蛋的蛋最好选用鸭蛋,因为鸭蛋的蛋黄颜色较鲜艳,做出来的溏心效果会比较美,而且鸭蛋吃起来的口感也比较Q。鸭蛋的蛋壳会比较硬,剥壳时会比较难,不过如果将蛋放在流动的水下,让水流进蛋壳与内膜之间,那剥蛋壳就会变得比较容易。


为了方便,我提早一天就把蛋准备好,浸泡在卤汁里一晚,让蛋充分入味,隔天取出熏一下子就可以吃了。我家小宝贝已经很会剥蛋壳了,平时准备给她的水煮蛋都是她自己剥壳的,如果看到我要剥蛋壳她一定会吵着要帮忙,所以我只好提早一天准备。除了鸭蛋我也有试过用鸡蛋来做熏蛋。如果用鸡蛋的话溏心部份会比较水,不过两种蛋做出来的溏心蛋都各有各的特色,要选择哪种蛋就视乎你喜欢哪种口感。现在的鸭蛋不会太难找,一般的超市都可以买到,我家的鸭蛋也是从超市买回来的。


近期打算走些较健康的路线,所以就准备了沙拉来当晚餐,不过老公是非常爱吃肉的人,一下子要他吃整大碗的青菜是时比较困难,所以我在沙拉里加入了水煮五花肉片、茶熏蛋和烤核桃,让翠绿的沙拉不再单调,颜色和口感也更加丰富。我比较喜欢清爽的酱汁,所以就准备了和风酱汁来搭配我的那份沙拉,而老公比较喜欢浓郁的味道,我就用了市售的深煎芝麻醬来做沙拉酱。其实偶尔准备沙拉当晚餐也不错,不但有饱足感,而且也比较健康。


茶熏蛋

材料:
鸭蛋 2粒(每粒重65克)
卤汁 1杯(做法参考这里

烟熏料:
茶叶 10克
黄糖 100克
白米 100克

做法:
1. 准备溏心蛋:
煮一锅水,水滚后转至中火,加入鸭蛋煮6分钟。不断搅动以确保蛋黄保持在中间。鸭蛋煮好后立即从热水中取出,用流动的水冲洗,然后将鸭蛋放入一盆冷水中浸泡5分钟。

把鸭蛋从冷水中取出,用茶匙背轻轻敲打蛋壳,然后小心地将蛋壳剥掉。把蛋放入一个碗或食物盒里,加入卤汁,腌至少1小时或放入冰箱里至隔夜。

2. 准备烟熏:
把锡箔纸铺平在锅内,加入白米、糖和茶叶。在锅内放入一个蒸架,把锅盖上,用大火加热。当锅盖边起烟时就将鸭蛋放在蒸架上,加盖烟熏3分钟,然后即可熄火。

3. 上桌
将熏蛋取出,抹上少许麻油,切半即可享用。


Tea Smoked Egg

Ingredients:
2 duck eggs (65g each)
1 cup of leftover poaching liquid (please see here for the recipe)

Tea-smoking mixture:
10 g tea leaves
100 g brown sugar
100 g uncooked white rice

Method:
1. To prepare soft boiled egg:
Bring a pot of water to boil. Turn to medium heat once the water starts boiling. Add duck eggs and cook for 6 minutes. Stir the eggs constantly, and this will help to centre the egg yolks. Once the duck eggs are cooked, remove immediately from hot water and rinse under running water. Transfer the eggs to a bowl of iced water and let them soak for 5 minutes.

Remove the eggs from iced water. Crack the shell with the back of a spoon and peel the egg gently. Place the peeled eggs in a bowl or food container, add leftover poaching liquid and let the eggs marinate for at least 1 hour or overnight in the refrigerator.

2. To smoke the egg:
Line the bottom of the wok with a piece of aluminium foil. Add rice, sugar and tea leaves. Put a steaming rack in the center, then cover the wok with a lid. Heat the wok over high heat till the smoke begins to appear. Place the eggs on the rack and cover the wok with lid. Smoke the eggs for 3 minutes, then turn off the heat.

3. To serve:
Remove the smoked eggs from wok. Brush with some sesame oil, cut into half and serve.


This post is linked to the event Little Thumbs Up (July 2015 Event: Tea) organised by Zoe of Bake for Happy Kids and Doreen of My Little Favourite DIY and hosted by Cheryl of Baking Taitai.


Friday, 24 July 2015

桂花茶熏鸡翅 Osmanthus Tea Smoked Chicken Wing

上星期煮了茶香熏豉油鸡,试了后就爱上那茶熏味,所以这星期我再以茶熏鸡,这次加了干桂花一起烟熏,让鸡翅吃起来带点淡淡的桂花香味。之前剩下的卤汁我保留了下来,加热后再用来卤这批鸡翅,鸡翅的肉会比较少,所以我缩短了煮鸡翅的时间,而浸泡鸡翅的时间同样是三个小时。当天的晚餐除了桂花茶熏鸡翅外,我还准备了溏心蛋,上次的溏心蛋太过生了,所以我想再次挑战,反正家里的鸭蛋还有很多,还好这次成功了。


其实这熏鸡翅除了可以当晚餐菜肴外,还可以拿来当前菜或下酒菜,或者是当派对里的小吃都不错,相信喜欢吃鸡翅的朋友们一定会喜欢这道熏鸡翅。


茶熏蛋的食谱我会留待下一次才分享,
因为当时的蛋切得不是太美,
而且一些蛋黄液在排盘时都流掉了。
隔几天后我从新煮过蛋,熏过后再拍了一些照片,
整理好后很快就会上帖子了。


桂花茶熏鸡翅

材料:
鸡翅膀 6个(分成翅棒腿和鸡中翅)
卤汁 1锅(做法参考这里

烟熏料:
茶叶 10克
黄糖 50克
白米 150克
干桂花 2汤匙

做法:
1. 豉油鸡翅:
在一个锅里把卤汁煮至滚,然后转至小火,将鸡翅加入煮10分钟,立即熄火离炉。将锅放置一旁,让鸡翅浸泡在卤汁里三个小时。三小时后将鸡翅取出,放入盘中。

2. 准备烟熏:
把锡箔纸铺平在锅内,加入白米、糖、干桂花和茶叶。在锅内放入一个蒸架,把锅盖上,用大火加热。当锅盖边起烟时就将鸡翅放在蒸架上,加盖烟熏8分钟,然后即可熄火。

3. 上桌
将熏鸡翅取出,抹上少许麻油,排盘即可享用。


Osmanthus Tea Smoked Chicken Wing

Ingredients:
6 chicken wings, cut into 2 pieces, the "flat" and the "drum"
1 pot of leftover poaching liquid (please see here for the recipe)

Tea-smoking mixture:
10 g tea leaves
50 g brown sugar
150 g uncooked white rice
2 tbsp dried osmanthus flower

Methods:
1. Soy Sauce Poached Chicken Wings:
Pour the braising liquid in a pot and bring to a boil, then turn to low heat. Add the chicken wings to the pot and poach for exactly 10 minutes, then turn off the heat and remove the pot from stove immediately. Allow the chicken wings to steep in the stock for 3 hours. After 3 hours remove the chicken wings from stock and transfer to a plate.

2. To smoke the chicken:
Line the bottom of the wok with a piece of aluminium foil. Add rice, sugar, dried osmanthus flower and tea leaves. Put a steaming rack in the center, then cover the wok with a lid. Heat the wok over high heat till the smoke begins to appear. Place the chicken wings  on the rack and cover the wok with lid. Smoke the chicken wings for 8 minutes, then turn off the heat.

3. To serve:
Remove the smoked chicken wings from wok. Brush some sesame oil on the chicken wings and serve.


This post is linked to the event Little Thumbs Up (July 2015 Event: Tea) organised by Zoe of Bake for Happy Kids and Doreen of My Little Favourite DIY and hosted by Cheryl of Baking Taitai.